|
Adding Glossaries
Last modified on 04 July 2023 03:11 PM
|
Glossaries are tools which allow instructors and students to develop a list of terms and definitions relevant to their course.
These terms and definitions can be added throughout the term or within a specified time range. The glossary can be fully open and collaborative where students enter their own terms and comment on each other's entries, or it can be more restricted where each student entry requires instructor approval. The glossary activity is a useful way to help students review important terms for a course by editing themselves, or as a way for the instructor to reference these terms for students.
Adding a Glossary
- Click on Edit mode at the top right of your course page.
- Choose the topic area where you wish to add content (the week, unit, etc.) and click on the Add an activity or resource link.
- Click on the Glossary icon, and a settings page will open.
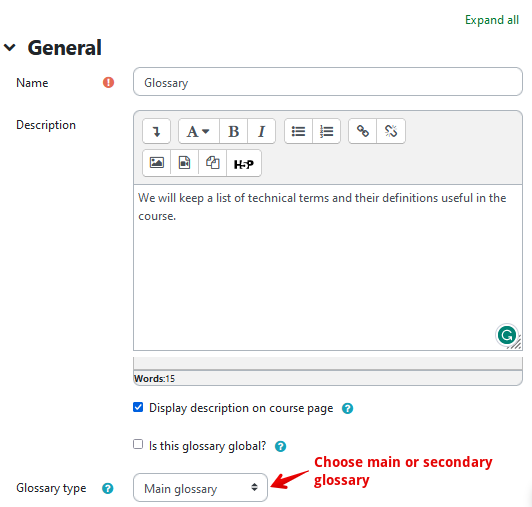
General
- "Name" is required. Make this as meaningful as possible for your students.
- "Description" is optional. You may provide an explanation or instructions here for your students.
- "Display description on course page" - Toggles whether or not the description of your glossary will be displayed on the course page below the link to your glossary.
- Global glossaries are accessible across eClass. They are not implemented here.
- "Glossary type"
- 'Main glossary' - A glossary in which entries from secondary glossaries can be imported. There can only be one main glossary in a course.
- 'Secondary glossary' - A glossary in which glossary entry import is not required.
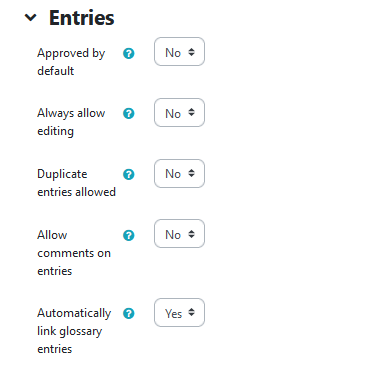
Entries
- "Approved by default" - Toggles whether or not entries require approval by a teacher before they are viewable by everyone. Setting this to "no" allows for greater quality control.
- "Always allow editing" - Specifies whether entries are always editable or whether students can only edit their entries during a configured editing time (usually 30 minutes).
- "Duplicate entries allowed" - Toggles whether or not multiple entries can have the same concept name.
- "Allow comments on entries" - Toggles whether or not all participants with permission to create comments will be able to add comments to glossary entries.
- "Automatically link glossary entries" - Toggles whether or not the “Add a new entry” form includes the option to automatically link the entry wherever the concept words and phrases appear throughout the rest of the course, provided that site-wide glossary auto-linking has been enabled by an administrator.
Appearance
- "Display format" - There are 7 display formats:
- 'Continuous without author' - Entries are displayed one after another without any separation apart from editing icons.
- 'Encyclopedia' - As for 'Full with author', but attached images are shown inline.
- 'Entry list' - Concepts are listed as links.
- 'FAQ' - the words QUESTION and ANSWER are appended to the concept and definition respectively.
- 'Full with author' - A forum-like display format showing the author’s data and with attachments shown as links.
- 'Full without author' - A forum-like display format without authors and with attachments shown as links.
- 'Simple, dictionary style' - No authors are displayed and attachments are shown as links.
- "Approval display format" - Toggles the way in which you see glossary entries during the approval process. This is useful for those who want to see the names of students who submitted the term behind the scenes but did not publish this information to the rest of the class.
- "Entries shown per page" - Determines how many entries are shown on each page of the glossary.
- "Show alphabet links" - Toggles whether or not participants can browse the glossary by letters of the alphabet.
- "Show 'ALL' link" - Toggles whether or not participants can browse all entries at once.
- "Show 'Special' link" - Toggles whether or not participants can browse the glossary by special characters, such as @ and #.
- "Allow print view" - Toggles whether or not students are provided with a link to a printer-friendly version of the glossary. The link is always available to teachers.
Note: When the Appearance > Display format setting is changed, the change is global for the Glossary. For example, if the setting was "Simple, dictionary style" where no authors were visible, and the setting is changed to "Full with author," then all users -- Instructors, TAs, Students and Auditors -- will see the author's name.

Ratings
Common module settings
- "Availability" - This setting has 3 options:
- 'Show on course page' - The activity is available to students (subject to any access restrictions which may be set).
- 'Hide from students' - The activity is only available to users with permission to view hidden activities (by default, users with the role of teacher or non-editing teacher).
- 'Make available but now shown on course page' - A link to the activity must be provided from elsewhere, such as from a page resource. The activity would still be listed in the gradebook and other reports.
- "ID number" - An ID number identifies the activity for grade calculation purposes.

Restrict access
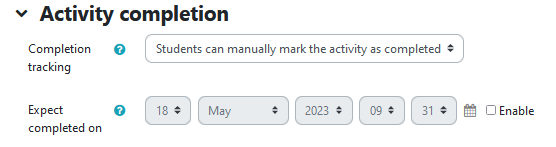
Activity completion
-
Please note that you will not see the activity completion options until activity completion is enabled for your course. The steps to enable activity completion tracking can be found in our article on Completion Tracking.
-
"Completion tracking" - Activity completion is tracked, either manually or automatically, based on certain conditions. Multiple conditions may be set if desired. If so, the activity will only be considered complete when ALL conditions are met. A tick next to the activity name on the course page indicates when the activity is complete.
- "Require view"
- Student must view this activity to complete it - A tick will only appear once the student views the activity.
- "Require grade"
- Student must receive a grade to complete this activity - A tick will only appear once the students receives a grade in this activity.
- "Require entries"
- Student must create entries - If enabled, you must specify the number of entries the student is required to create.
- "Expect completed on" - This setting specifies the date when the activity is expected to be completed. The date is not shown to students and is only displayed in the activity completion report.
Tags
Notes
Glossaries will not be rolled forward from year to year along with the rest of your course content owing to privacy concerns as it is not possible to anonymize entries or strip student information from entries.
If you are using the glossary tool as a more static object where you create all the entries, you will need to contact IST eClass Support to have the glossary content copied forward into your new term courses. This article outlines this question in more detail.
|
 (0 vote(s)) (0 vote(s)) Helpful Not helpful
|