|
Adding Wikis
Last modified on 15 August 2025 03:58 PM
|
NOTICE: Please be advised that the content of this article may only be relevant for users concluding the final stages of course work on eClass or for users on the eClass External system. The eClass Learning Management System is currently in a read-only state that prohibits new courses, enrollments, and users from being added to the site. Credit courses and co-curricular courses at the UofA are now being delivered on Canvas, and full articles on how to use Canvas can be found here.
Wikis are collaborative tools where you and your students can enter any type of content regarding any topic that you specify. They are similar to both the Glossary and Database.
Wikis are an excellent way to make students work together to create a resource. A wiki starts with a front page, and all subsequent pages are created by creating links to new pages.
Adding a Wiki:
- Click on Edit mode at the top right of your course page.
- Move to the topic area where you wish to add content (the week, unit, etc.) and click on the Add an activity or resource link.
- Choose Wiki and a settings page will open.
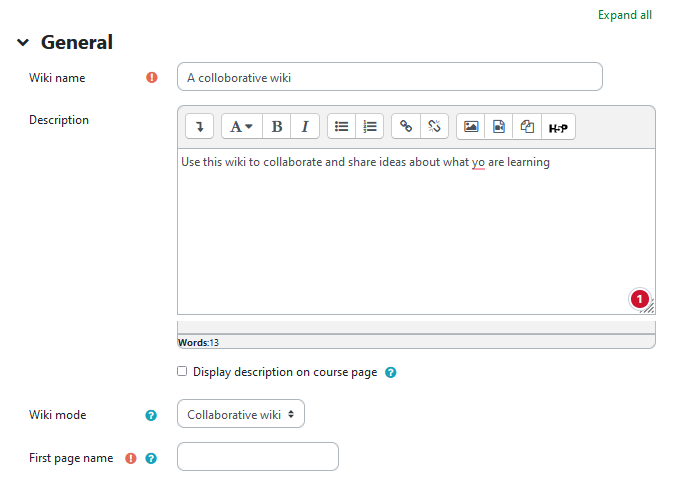
General:
- "Wiki name" is required. Make this as meaningful as possible for your students.
- "Description" is optional. You may provide explanation or instructions for your students here.
- "Wiki mode": Toggles whether the wiki is a:
- 'Collaborative wiki' - Everyone can edit the wiki.
- 'Individual wiki' - Everyone has their own wiki which only they can edit.
- "First page name" is also required: The name of the first page of the wiki, a foundation for the rest of the activity.

Format:
- "Default format": Determines the default format of the wiki. See Notes below.
- "Force format": If selected, there is no option to change the format when creating a new wiki page.

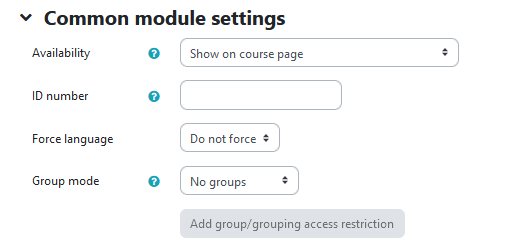
Common module settings:
- "Availability": This setting has 3 options:
- 'Show on course page' - The activity is available to students (subject to any access restrictions which may be set).
- 'Hide from students' - The activity is only available to users with permission to view hidden activities (by default, users with the role of teacher or non-editing teacher).
- 'Make available but now shown on course page' - A link to the activity must be provided from elsewhere, such as from a page resource. The activity would still be listed in the gradebook and other reports.
- "ID number": An ID number identifies the activity for grade calculation purposes.
- "Group mode": The group mode defined at course level is the default mode for all activities within the course. Each activity that supports groups can also define its own group mode, though if the group mode is forced at course level, the group mode setting for each activity is ignored. This setting has 3 options:
- 'No groups' - Students are not segregated into groups.
- 'Separate groups' - Only group members can see their own group while other groups remain invisible.
- 'Visible groups' - Group members can see other groups but still work in their own group.
- "Grouping": A grouping is a collection of groups within a course. If a grouping is selected, students assigned to groups within the grouping will be able to work together.
- '"Add group/grouping access restriction": Allows access only to students who belong to a specified group, or all groups.

Restrict access:
Activity completion:

Tags:
Editing a Wiki (in HTML Format):
Some Wiki elements may also be added using HTML, including: Links and URL.
- To add an internal link (to another eClass Wiki page), use double square brackets: [[internal page name]]
- To add an external link, type out the URL: http://www.ualberta.ca
Recall that you may use the HTML editor to make the majority of formatting changes.
Notes:
- If you are not an experienced wiki user, you should generally leave all wiki pages in HTML format.
- Wiki links that are red, mean that the page associated with that link has not yet been created and therefore contains no content. The link turns green when the page has been created.
- At any time you can view the revision history of the wiki or a map of all the wiki pages using the links in the top left corner of the wiki.
- There are some known Moodle issues with using groups/groupings and wikis so you should generally only use a wiki activity only for your entire cohort of students.
|
 (5 vote(s)) (5 vote(s)) Helpful Not helpful
|


