|
Adding Workshops
Last modified on 15 August 2025 04:10 PM
|
NOTICE: Please be advised that the content of this article may only be relevant for users concluding the final stages of course work on eClass or for users on the eClass External system. The eClass Learning Management System is currently in a read-only state that prohibits new courses, enrollments, and users from being added to the site. Credit courses and co-curricular courses at the UofA are now being delivered on Canvas, and full articles on how to use Canvas can be found here.
Workshops are a peer-assessment activity in which students can submit their work to a group and grade their own and each other's submissions.
Adding a Workshop
- Click on Edit mode at the top right corner of your class page.
- Move to the topic area where you wish to add content (the week, unit, etc…) and click on the Add an activity or resource link.
- Choose Workshop and a settings page will open.
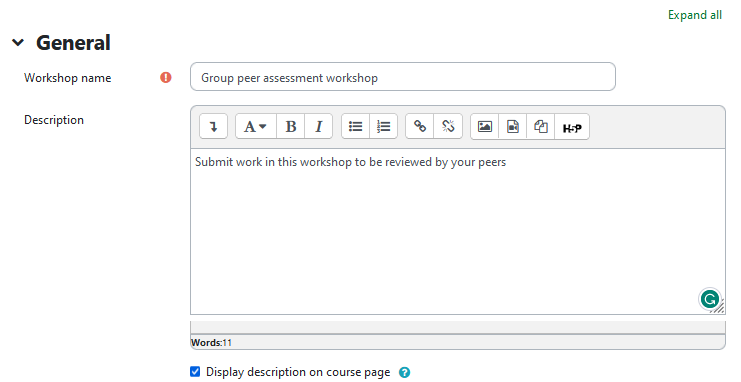
General
- "Workshop name" is required. Make this as meaningful as possible for your students.
- "Description" is optional. You may provide an explanation or instructions here for your students.
- "Display description" on the course page toggles whether or not the description of the workshop will be displayed on the course page below the link to the workshop.
Grading settings
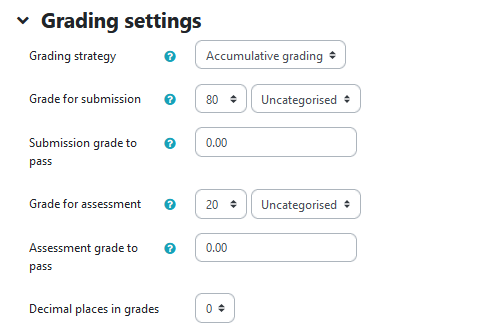
- "Grading strategy" - Determines the assessment form used and the method of grading submissions. There are 4 options:
- 'Accumulative grading' - Comments and a grade are given regarding specified aspects.
- 'Comments' - Comments are given regarding specified aspects but no grade can be given.
- 'Number of errors' - Comments, and a yes/no assessment, are given regarding specified assertions.
- 'Rubric' - A level assessment is given regarding specified criteria
- "Grade for submission" - Specifies the maximum grade that may be obtained for submitted work.
- "Submission grade to pass" - Determines the minimum submission grade required to pass. The value is used in activity and course completion, and in the gradebook, where pass grades are highlighted in green and fail grades in red.
- "Grade for assessment" - Specifies the maximum grade that may be obtained for submission assessment.
- "Assessment grade to pass" - Determines the minimum assessment grade required to pass. The value is used in activity and course completion, and in the gradebook, where pass grades are highlighted in green and fail grades in red.
- "Decimal places in grades" - Determines the number of digits shown after the decimal point when displaying grades. It only affects the display of grades, not the grades stored in the database, nor the internal calculations, which are carried out to full accuracy.
Submission settings
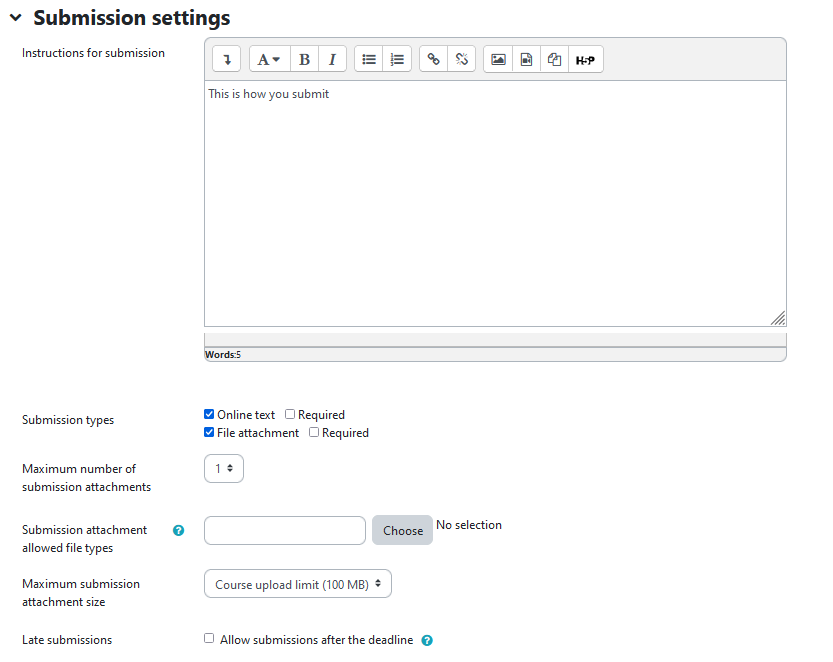
- "Instructions for submission" - You may provide instructions for submission in the box.
- "Submission type" - Specifies whether online text or file attachments are allowed and whether they are required
- "Maximum number of submission attachments" - Specifies the maximum number of attachments that can be submitted.
- "Submission attachment allowed file types" - Submission attachment file types can be restricted by providing a list of allowed file types. If the field is left empty, then all file types are allowed. Note that PNG files are not recommended.
- "Maximum submission attachment size" - Specifies the maximum attachment size that can be submitted.
- "Late submissions"
- 'Allow submissions after the deadline' - Toggles whether or not an author may submit their work after the submission deadline or during the assessment phase. Late submissions cannot be edited though.
Assessment settings
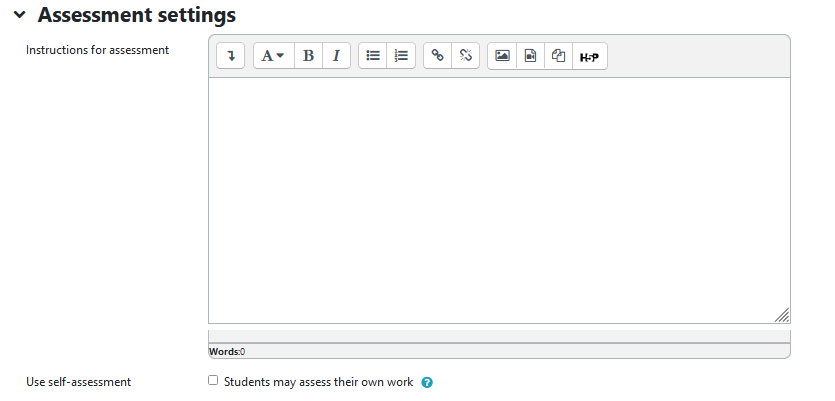
- "Instructions for assessment" - You may provide instructions for assessment in the box.
- "Use self-assessment"
- 'Student may assess their own work' - Toggles whether or not students can mark their own work.
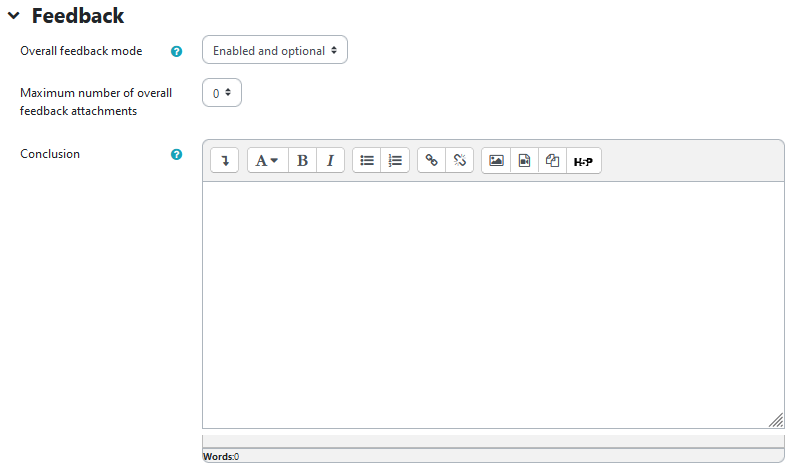
Feedback
- "Overall feedback mode" - If enabled, a text field is displayed at the bottom of the assessment form. Reviewers can put the overall assessment of the submission there, or provide additional explanation of their assessment.
- "Maximum number of overall feedback attachments" - Specifies the maximum number of overall feedback attachments.
- "Feedback attachment allowed file types" - Feedback attachment file types can be restricted by providing a list of allowed file types. If the field is left empty, then all file types are allowed.
- "Maximum overall feedback attachment size" - Specifies the maximum overall feedback attachment size.
- "Conclusion" - The conclusion text is displayed to participants at the end of the activity.
Example submissions
- "Use examples"
- 'Example submissions are provided for practice in assessing' - If enabled, users can try assessing one or more example submissions and compare their assessment with a reference assessment. The grade is not counted in the grade for assessment.
- "Mode of examples assessment" - Provided that ‘Example submissions are provided for practice in assessing’ is enabled, you may choose from any of the following:
- 'Assessment of example submission is voluntary'
- 'Examples must be assessed before own submission'
- 'Examples are available after own submission and must be assessed before peer assessment'

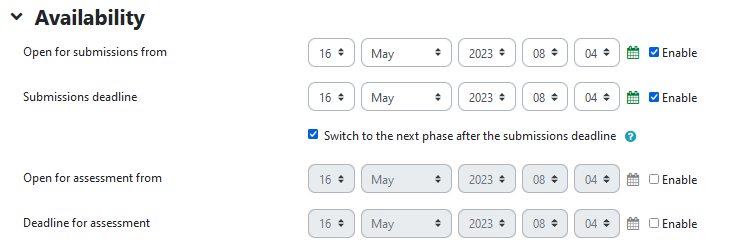
Availability
This setting allows you to set up the available time for submission and for assessment.
- "Switch to the next phase after the submissions deadline" - If the submissions deadline is specified and this box is checked, the workshop will automatically switch to the assessment phase after the submissions deadline. If you enable this feature, it is recommended to set up the scheduled allocation method, too. If the submissions are not allocated, no assessment can be done even if the workshop itself is in the assessment phase. See Submission phases below.
Common module settings
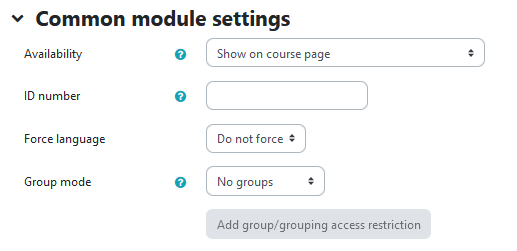
- "Availability" - This setting has 3 options:
- 'Show on course page' - The activity is available to students (subject to any access restrictions which may be set).
- 'Hide from students' - The activity is only available to users with permission to view hidden activities (by default, users with the role of teacher or non-editing teacher).
- 'Make available but now shown on course page' - A link to the activity must be provided from elsewhere, such as from a page resource. The activity would still be listed in the gradebook and other reports.
- "ID number" - An ID number identifies the activity for grade calculation purposes.
- "Group mode" - The group mode defined at course level is the default mode for all activities within the course. Each activity that supports groups can also define its own group mode, though if the group mode is forced at course level, the group mode setting for each activity is ignored. This setting has 3 options:
- 'No groups' - Students are not segregated into groups.
- 'Separate groups' - Only group members can see their own group while other groups remain invisible.
- 'Visible groups' - Group members can see other groups but still work in their own group.
- "Grouping" - A grouping is a collection of groups within a course. If a grouping is selected, students assigned to groups within the grouping will be able to work together.
- '"Add group/grouping access restriction" - Allows access only to students who belong to a specified group, or all groups.
Restrict access
Activity completion
-
Please note that you will not see the activity completion options until activity completion is enabled for your course. The steps to enable activity completion tracking can be found in our article on Completion Tracking.
-
'Completion tracking' - Activity completion is tracked, either manually or automatically, based on certain conditions. Multiple conditions may be set if desired. If so, the activity will only be considered complete when ALL conditions are met. A tick next to the activity name on the course page indicates when the activity is complete.
- "Require view"
- Student must view this activity to complete it - A tick will only appear once the student views the activity.
- "Require grade"
- Student must receive a grade to complete this activity - A tick will only appear once the student receives a grade for this activity.
- "Expect completed on" - This setting specifies the date when the activity is expected to be completed. The date is not shown to students and is only displayed in the activity completion report.

Tags
Submission phases
As the instructor, you will have to move the workshop into its various phases (submission, assessment, grading evaluation or closed). When you are ready to move into the next phase of the workshop, enter the workshop then click the link to switch to the next phase at the top of each phase.
If on the other hand you have set Availability to move automatically to the next phase, you must also allocate submissions:

Any incomplete action in a phase can be set by clicking on the 'X' beside the incomplete item.
An in-depth guide for using the workshop is available from Moodle HQ.
|
 (3 vote(s)) (3 vote(s)) Helpful Not helpful
|


