|
Setting Up Gradebook Categories
Last modified on 15 August 2025 04:20 PM
|
NOTICE: Please be advised that the content of this article may only be relevant for users concluding the final stages of course work on eClass or for users on the eClass External system. The eClass Learning Management System is currently in a read-only state that prohibits new courses, enrollments, and users from being added to the site. Credit courses and co-curricular courses at the UofA are now being delivered on Canvas, and full articles on how to use Canvas can be found here.
Gradebook categories are useful for organizing and grouping multiple course assessment items by type. For example, if the course contains a midterm worth 30%, three lab assignments worth 30% overall and a final exam worth 40%, creating a category for the lab assignments will allow instructors to distribute and weigh grades accordingly as well as allow students to view grouped assessment items in the gradebook.
In addition, categories can be used to weight the grade items within the category differently from the course total calculation. This can be helpful in cases where you might want to drop the lowest grade or give bonus marks.
Note: Basic assessment items should be added as automatically-graded 'Grade items' not 'Grade categories.' Using grade categories instead of grade items can cause problems in calculating grades.
Set up gradebook categories:
- Go to the 'Grader report' page by clicking on the Grades tab at the top of your course page.

- Click on the Grader report dropdown menu and click on Gradebook setup.

- Click on Add category at the top of the page.

- On the next screen, you need to enter the following required information:
- "Category Name" - Required name for your grade category. (E.g. "Lab Assignments")
- "Aggregation" type - Select the aggregation method to determine how grades in this category will be combined (e.g., Mean of grades, Weighted mean, Simple weighted mean, Sum of grades).
- "Exclude empty grades" - if you do not wish to include ungraded assignments in the grade calculation (e.g., different groups of students submit different assignments)
- "Drop the lowest" - You may also decide that only the best grades are included. Set a number for the number of assignments to exclude from the grade calculation
- "Grade type" - Choose from a value (numeric value), scale (item from the list that allows the options of quarter points, half points and discussion forum grading form) and text (feedback only).
- "Hidden" - Grades are hidden from students.
- "Locked" - Prevents grades from being automatically updated by a related activity.

- Select the Save changes button at the bottom.
- Categories appear as folders in your list. Once you have created the necessary categories, you will need to move existing activities or create new activities in these categories.

Move Existing Activities to Categories:
There are a couple of ways to move existing activities into new categories:
Option A) Using the move icon for each individual activity
- Click on the move icon next to the activity.

- Dashed rectangular boxes will appear highlighting the slots in which the activity can be moved to.

- Continue to move any necessary activities.
Option B) more conveniently uses a the drop-down menu to move multiple activities:
- Select the checkboxes next to the activities you want to move.
- Scroll down to the bottom of the page and click on the Move selected items to on the dropdown menu.
- Then, choose the category where you want to move the selected item(s):

Notes:
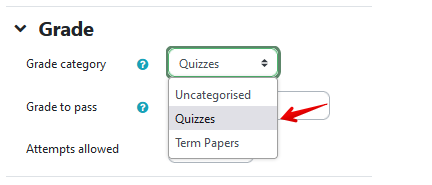
- If you later add new activities, you can select an existing grade category under the Grade setting of the activity.

Complete the remaining activity details as necessary and select Save and return to course. Your new activity should appear in the selected category when you return to the 'Gradebook setup' page. Continue to add any necessary activities and return to 'Gradebook setup' in the Gradebook.
- Using the Add grade item at the bottom of the page will generate a column for grades in your gradebook, but no corresponding activity in your course. The Add grade item feature is commonly used for recording grades that are not taken via eClass, e.g. exams, presentations, or participation scores.
- To access the advanced options for aggregating categories (such as dropping the lowest mark), select Show more... under Grade category in the category's settings.
|
|


