|
Enabling the Self Enrollment Method
Last modified on 15 August 2025 11:44 AM
|
|
|
NOTICE: Please be advised that the content of this article may only be relevant for users concluding the final stages of course work on eClass or for users on the eClass External system. The eClass Learning Management System is currently in a read-only state that prohibits new courses, enrollments, and users from being added to the site. Credit courses and co-curricular courses at the UofA are now being delivered on Canvas, and full articles on how to use Canvas can be found here.
eClass instructors can enable the Self-enrollment method in their course if they want to allow users to enroll themselves by accessing the URL to the course and clicking a link for self-enrollment. Self-enrollment is not required for regular Bear Tracks credit section enrollments. Regular enrollments occur automatically based on synchronization between an eClass credit course section and the corresponding Bear Tracks class list. Self-enrollment will normally be needed only for non-credit sections on the main production eClass (requires CCIDs) or eClass External course (users do not require CCIDs). If you are instructing a Bear tracks credit section and you do not see your students enrolled within 24 hours of your course being created, contact IST eClass support immediately at eclass@ualberta.ca or 780-492-9372. Contents:
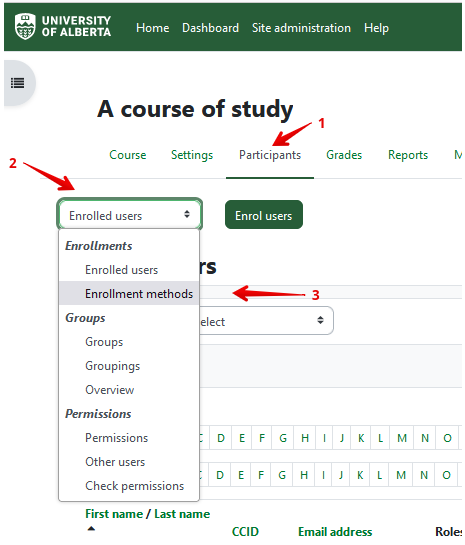
Enable Self-enrollment in your Non-credit or External course: 1. Click on the Participants tab at the top of your course page, then on the 'Enrolled users' drop-down and choose Enrollment methods:
2. From the 'Add method' drop-down menu, select Self enrollment.
1. A settings page will open with various settings that allow you to customize the way self-enrollments are processed within your course:
2. When you have finished selecting your preferred settings, click the Add method button at the bottom of the page. Instructors can also delete self-enrolled participants in bulk: 1. Go to your course's Participants list 2. Place checkmarks beside each user enrollment to be deleted. 3. Click the drop-down menu at the bottom of the list and choose 'Delete selected user enrollments'. Caution: Clicking the checkbox at the top of the column will select all users.
Student self-enrollment procedure: After the enrollment method has been created in your course, users can self-enroll by accessing the course URL (e.g., https://eclass.srv.ualberta.ca/course/view.php?id=nnnnn). As there is no course search function on eClass, 1. Provide the URL to the course to your users by entering the course yourself, then copying and pasting the URL into an email or other communication. 2. When your students click on the link, they will see the course page and a link to 'Enrol me in this course'. Note: They will not be able to access any course activities or resources until they are enrolled in the next step.
3. Students will be enrolled when they click the Enrol me button.
If you have specified an enrollment key, users will be prompted to enter this key before gaining access to the course (none is specified in the example above). | |
|
|


