|
Bulk Uploading Comments into the Canvas Gradebook
Last modified on 16 April 2026 03:04 PM
|
|
|
Instructors can now bulk upload text comments into their course gradebooks. This functionality is not native to Canvas so was constructed by the IST DLE Product Development and Integration team as an external LTI tool. There are a number of different use cases or workflows listed below the the tool can perform but note that none of these are required if instructors simply want to do a bulk grade-only upload into the gradebook from a csv file as the standard Canvas grade import workflow can do that. Contents:
Preparing Comments for UploadThe Bulk Feedback Upload Tool requires a .csv file that contains the student identifier and the comments. An example of the file can be downloaded here or it can be obtained from within the Bulk Upload tool itself (once launched in a course, see below):
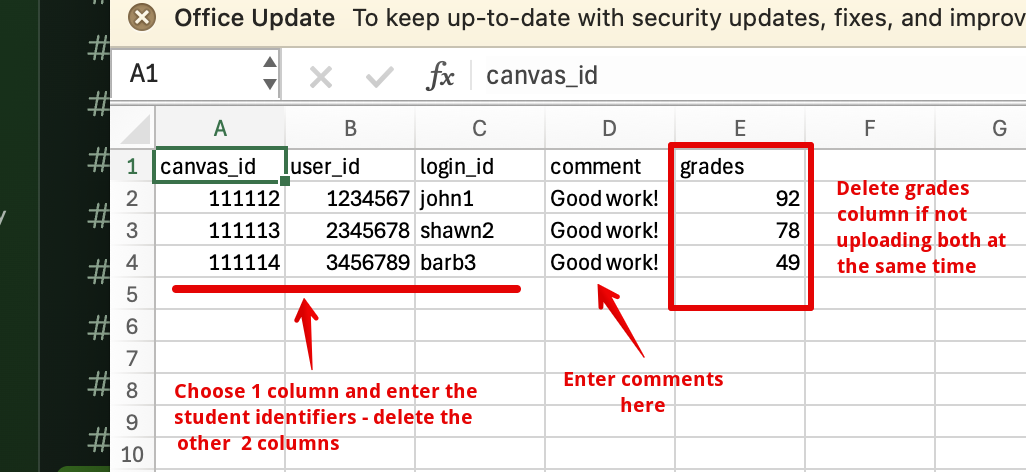
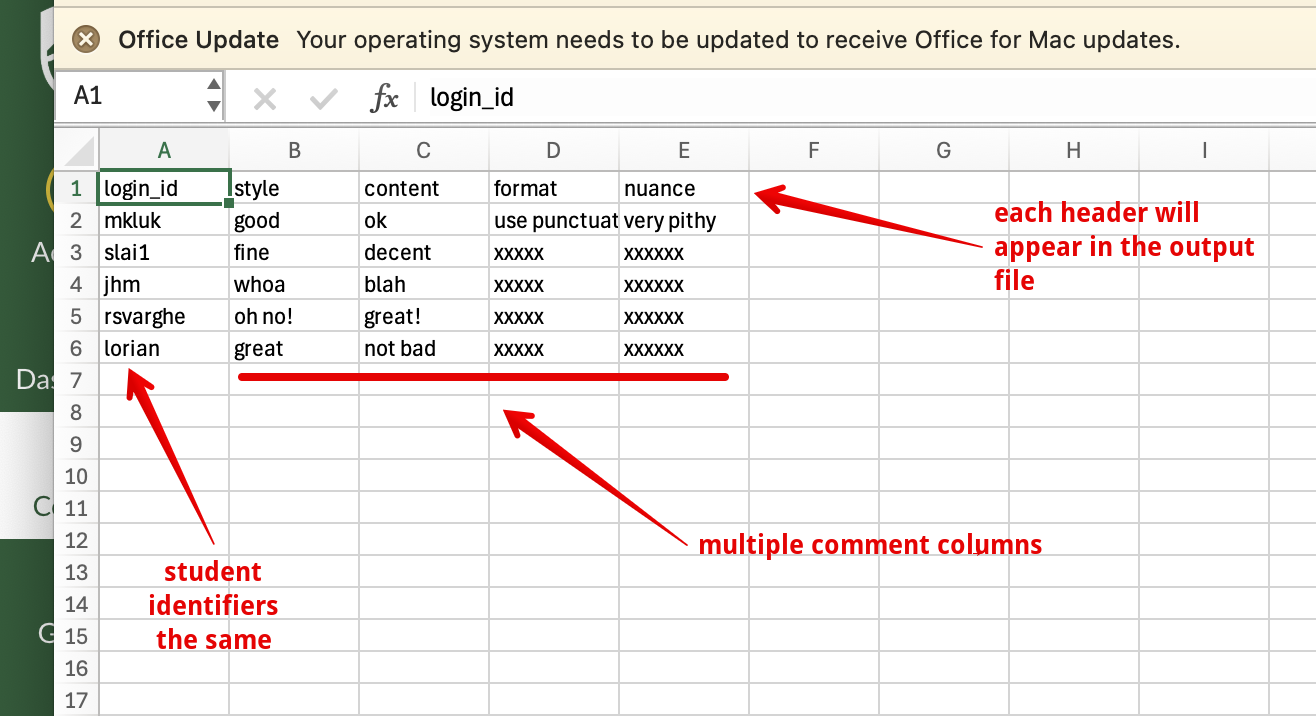
The .csv file for upload must contain one column identifying the students and one column containing their associated text comments; Additionally an optional column for grades can also be included. The column header names can be anything but there are only 3 options to identify students (map to) in Canvas: - Canvas ID: The Canvas user account id, available from a Canvas gradebook export in the column titled 'ID'; or - Student ID Number: available from a Bear Tracks course roster export or from a Canvas gradebook export in the column titled 'SIS User ID'; or - CCID: (recommended) The CCID, available from a Bear Tracks course roster export or a Canvas gradebook export in the column titled SIS Login ID. The downloadable .csv file (linked above) contains ALL these columns as examples so instructors will need to delete any columns that they are not using:
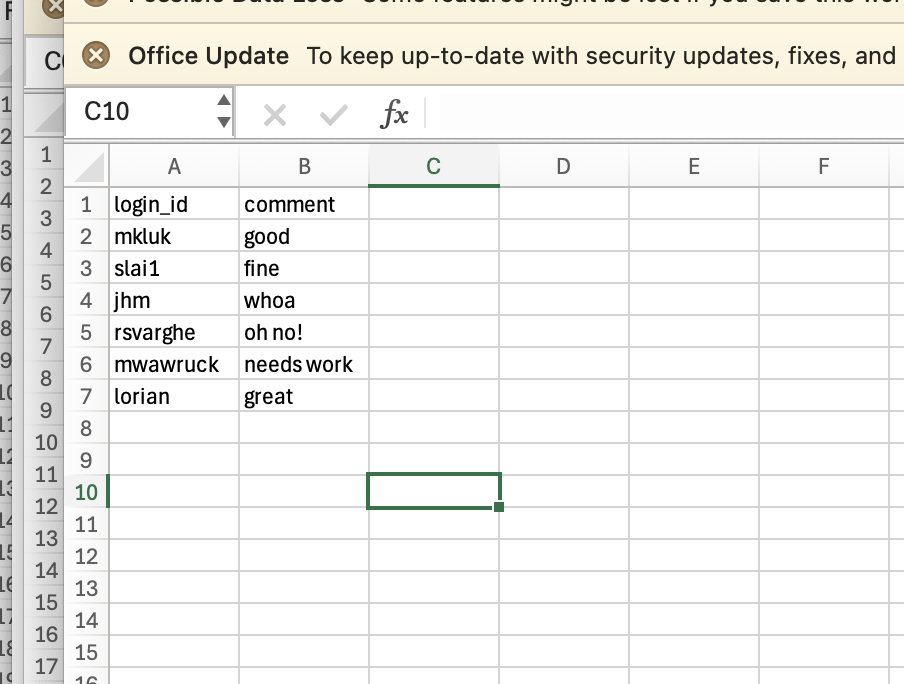
The final prepared file should look like this and then be saved as a csv for upload:
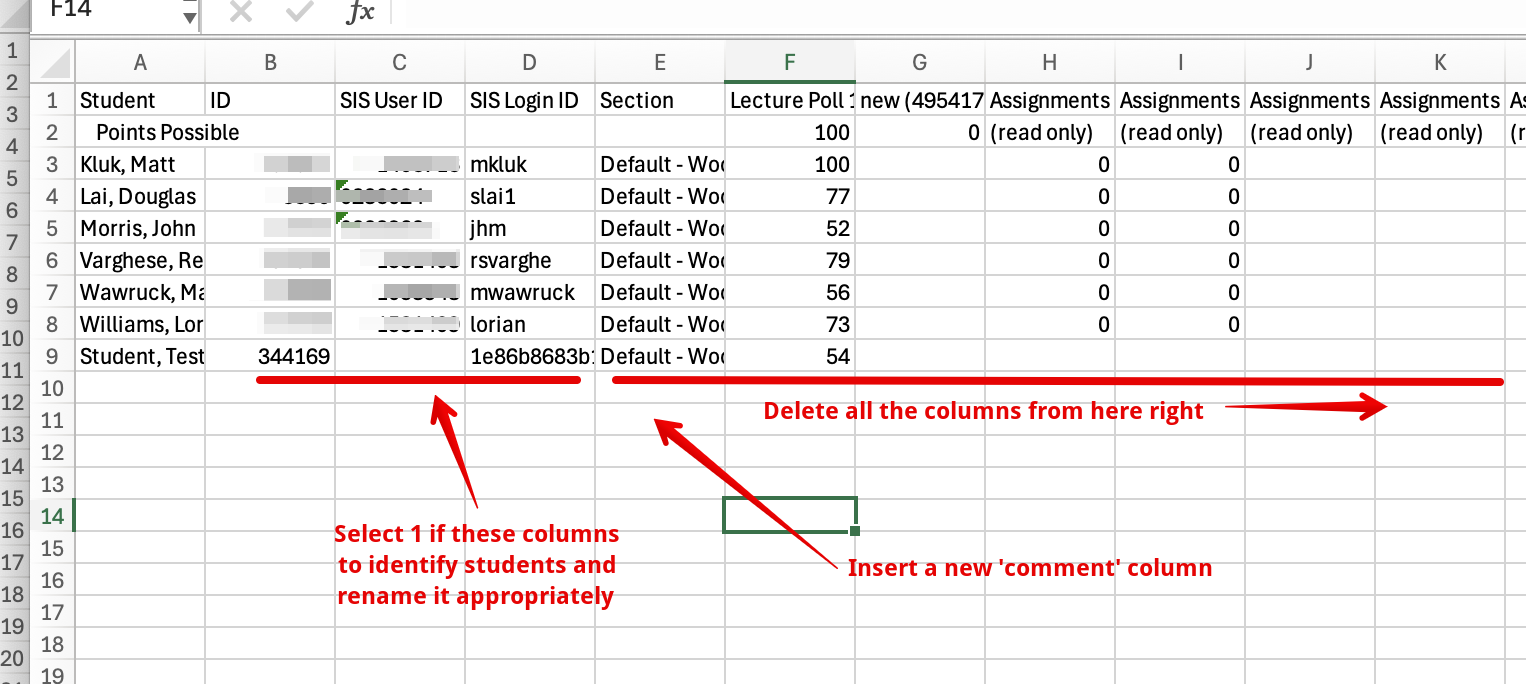
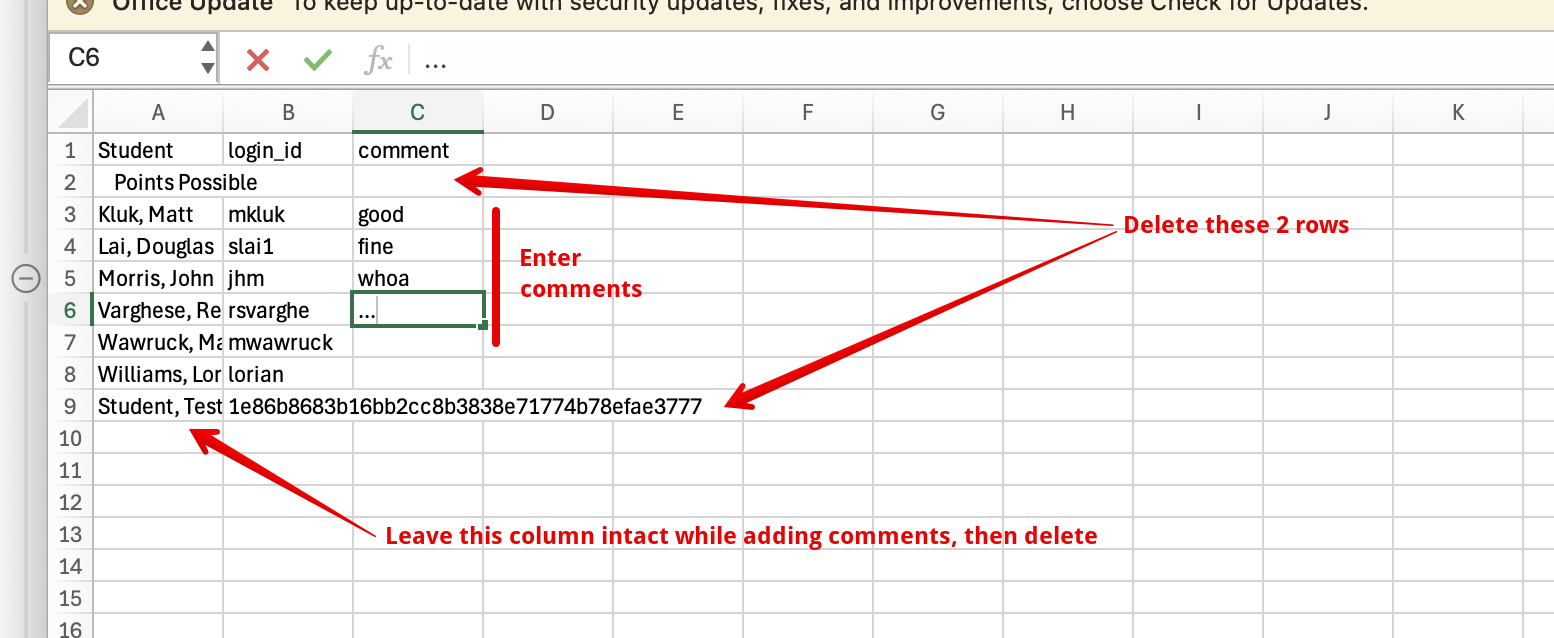
Using Other Spreadsheet types: It is also possible for instructors to create their .csv file by exporting their class roster from Bear Tracks, Canvas, or elsewhere. The example below shows a Canvas gradebook export being prepared to bulk import comments:
Instructors using Canvas gradebook exports should delete the 'Points Possible' row and the 'Student, Test' rows (if your gradebook export contains it). Then student comments can be added to the appropriate column. Instructors can leave the student 'Name' column in place while adding comments just to keep it organized:
Use Case 1: Creating a New Grade Item (Assignment) and Uploading CommentsThis workflow would be used if instructors needed to upload text or numeric data that is mapped to specific students using their CCID or student ID number. Examples might be text-based feedback from an in-person presentation, a randomly generated number for each student for participation in a research study, or their assigned seating number for a large in-person exams. To bulk upload comments: 1. To create a new grade item, create an assignment in a module or in the Assignments area of your course:
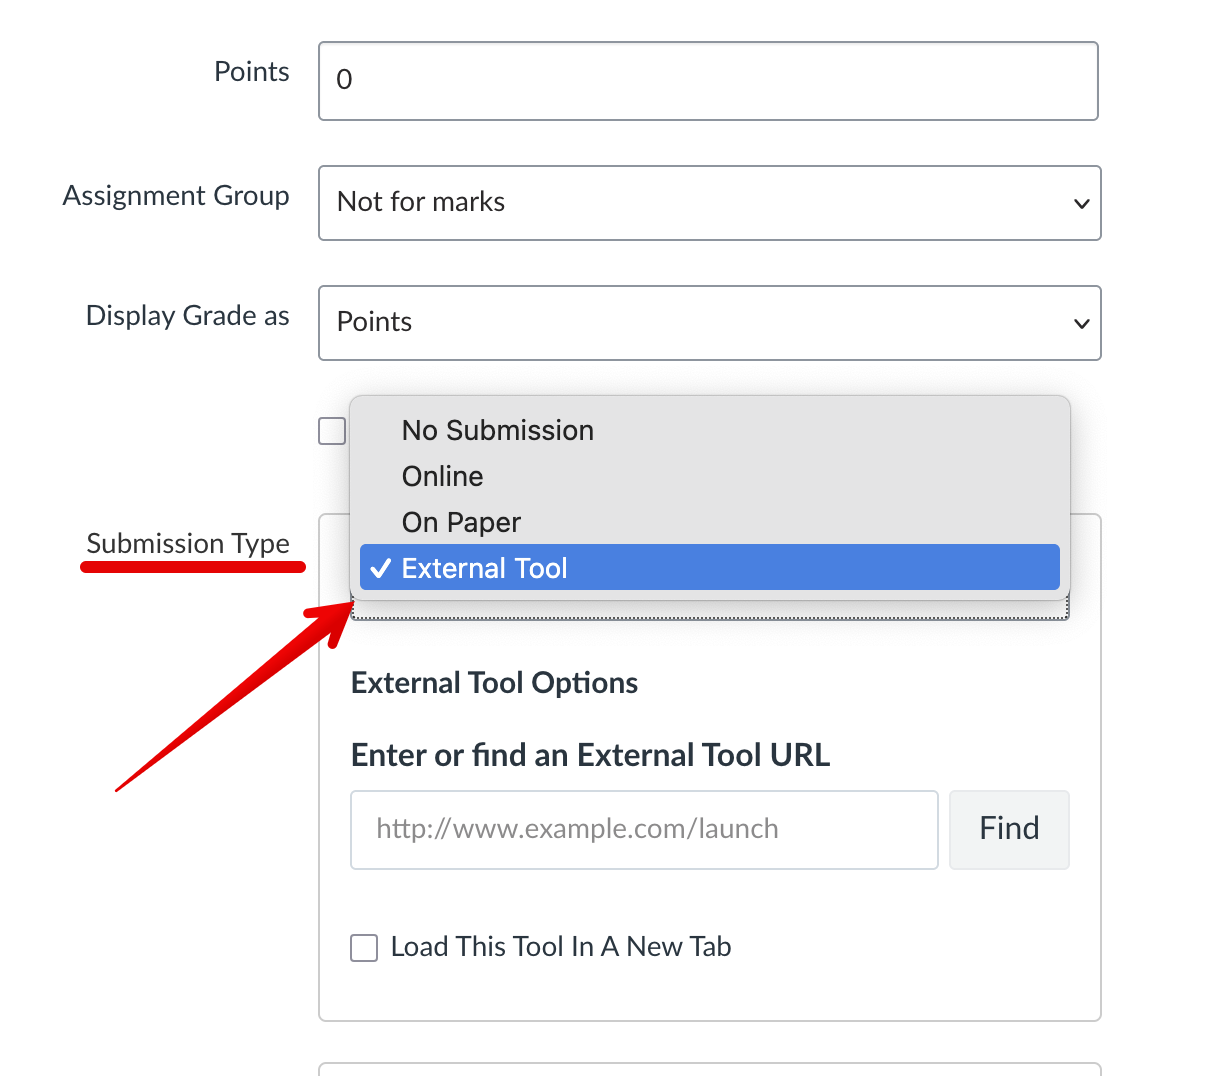
2. Give it a title and set the submission type to External tool:
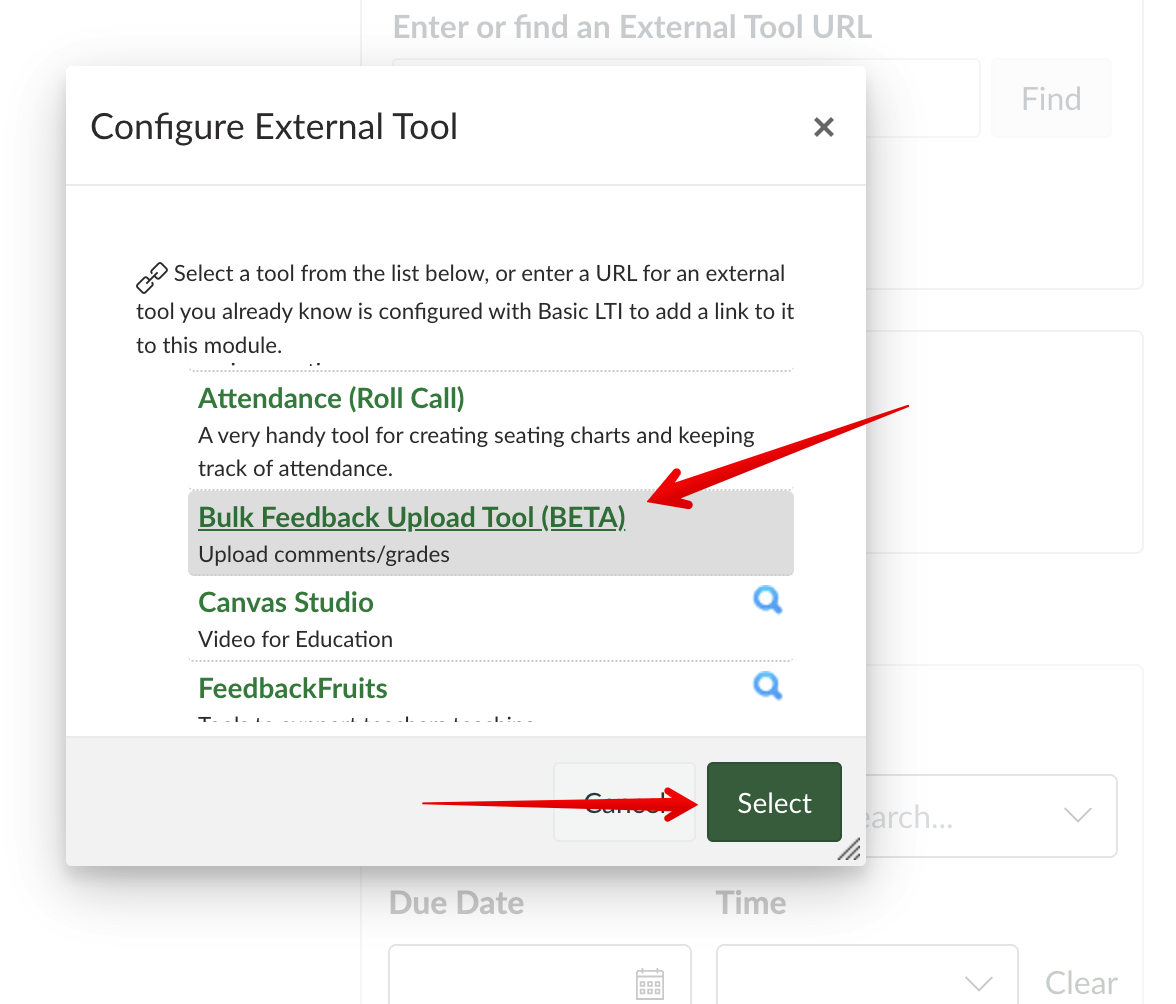
3. Then click Find, locate the Bulk Grade-Feedback Upload Tool, then click Select:
4. The rest of the assignment settings can be left at the default values so scroll to the bottom of the page then click Save & Publish:
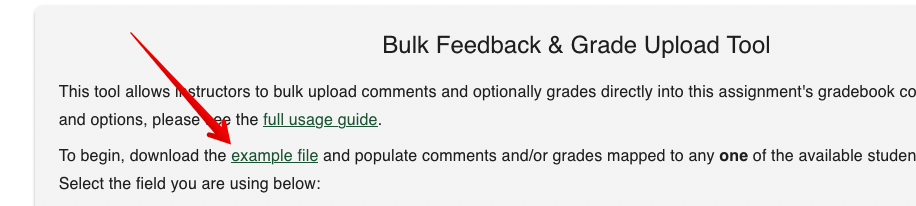
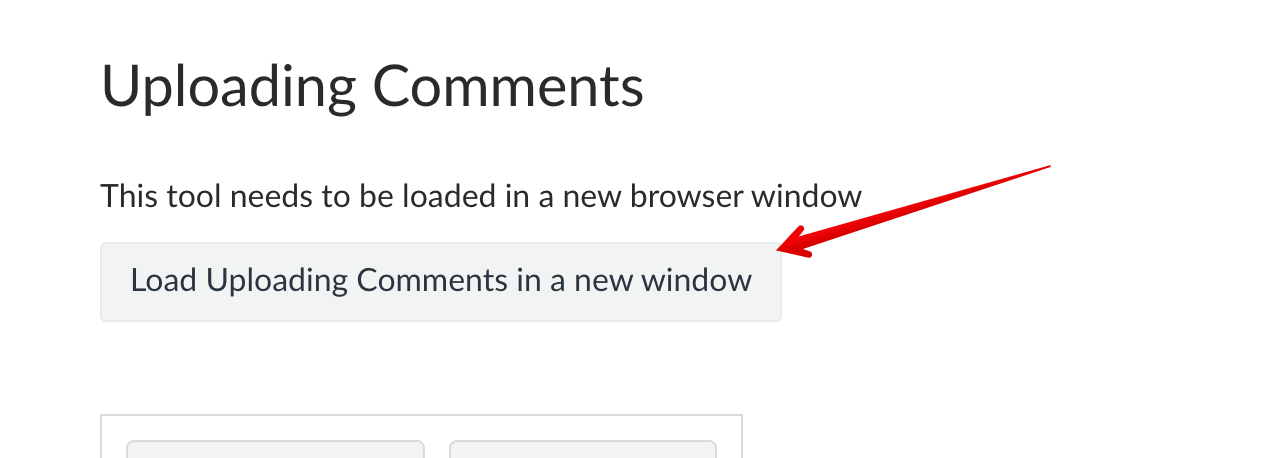
Important note: bulk uploads will not work in Canvas unless the assignment is published so instructors should warn students that they may receive notifications about the comments upload assignment being created (even if they have hidden the associated gradebook column.) 5. Once the csv file is prepared (see above), open the assignment you have just created which will open the Bulk Feedback-Grade Upload Tool interface:
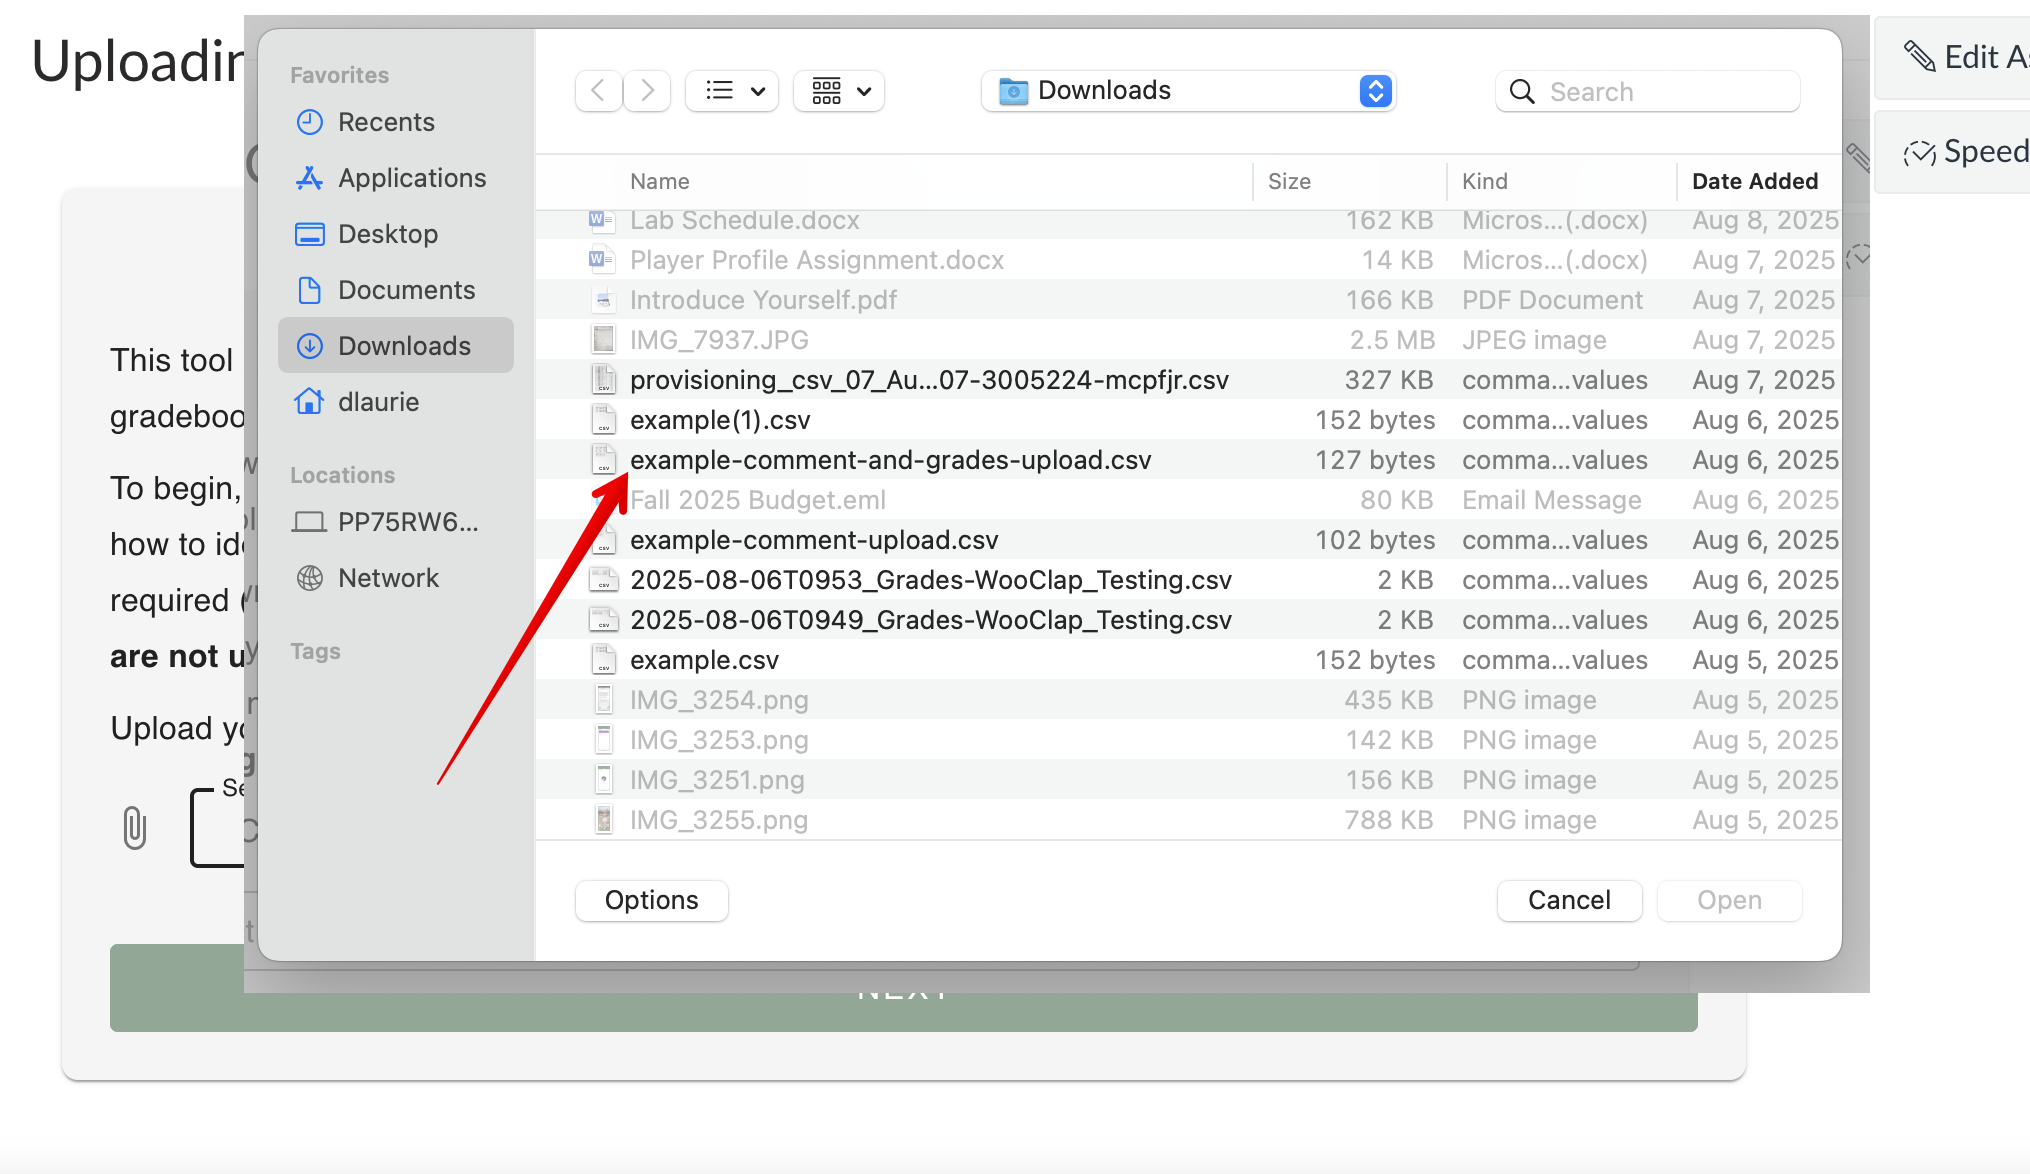
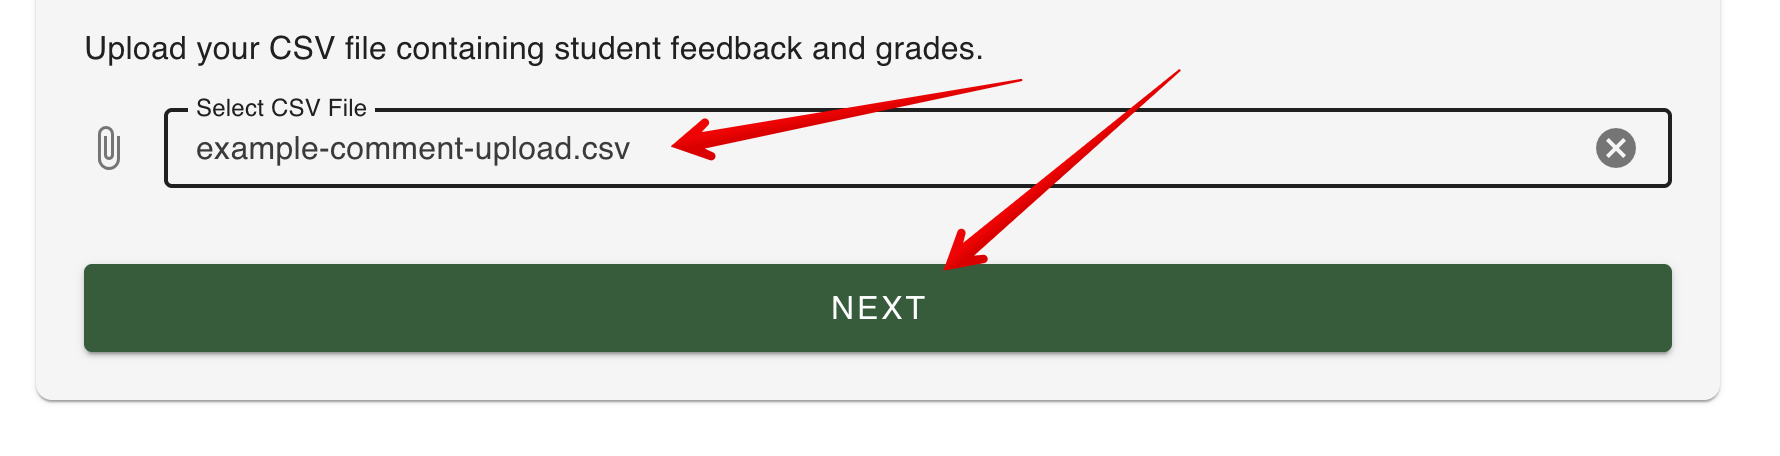
6. Next click the paper clip icon or anywhere in the Select CSV File area to locate and select the prepared csv file:
7. Once the file name appears in the selection box, click Next:
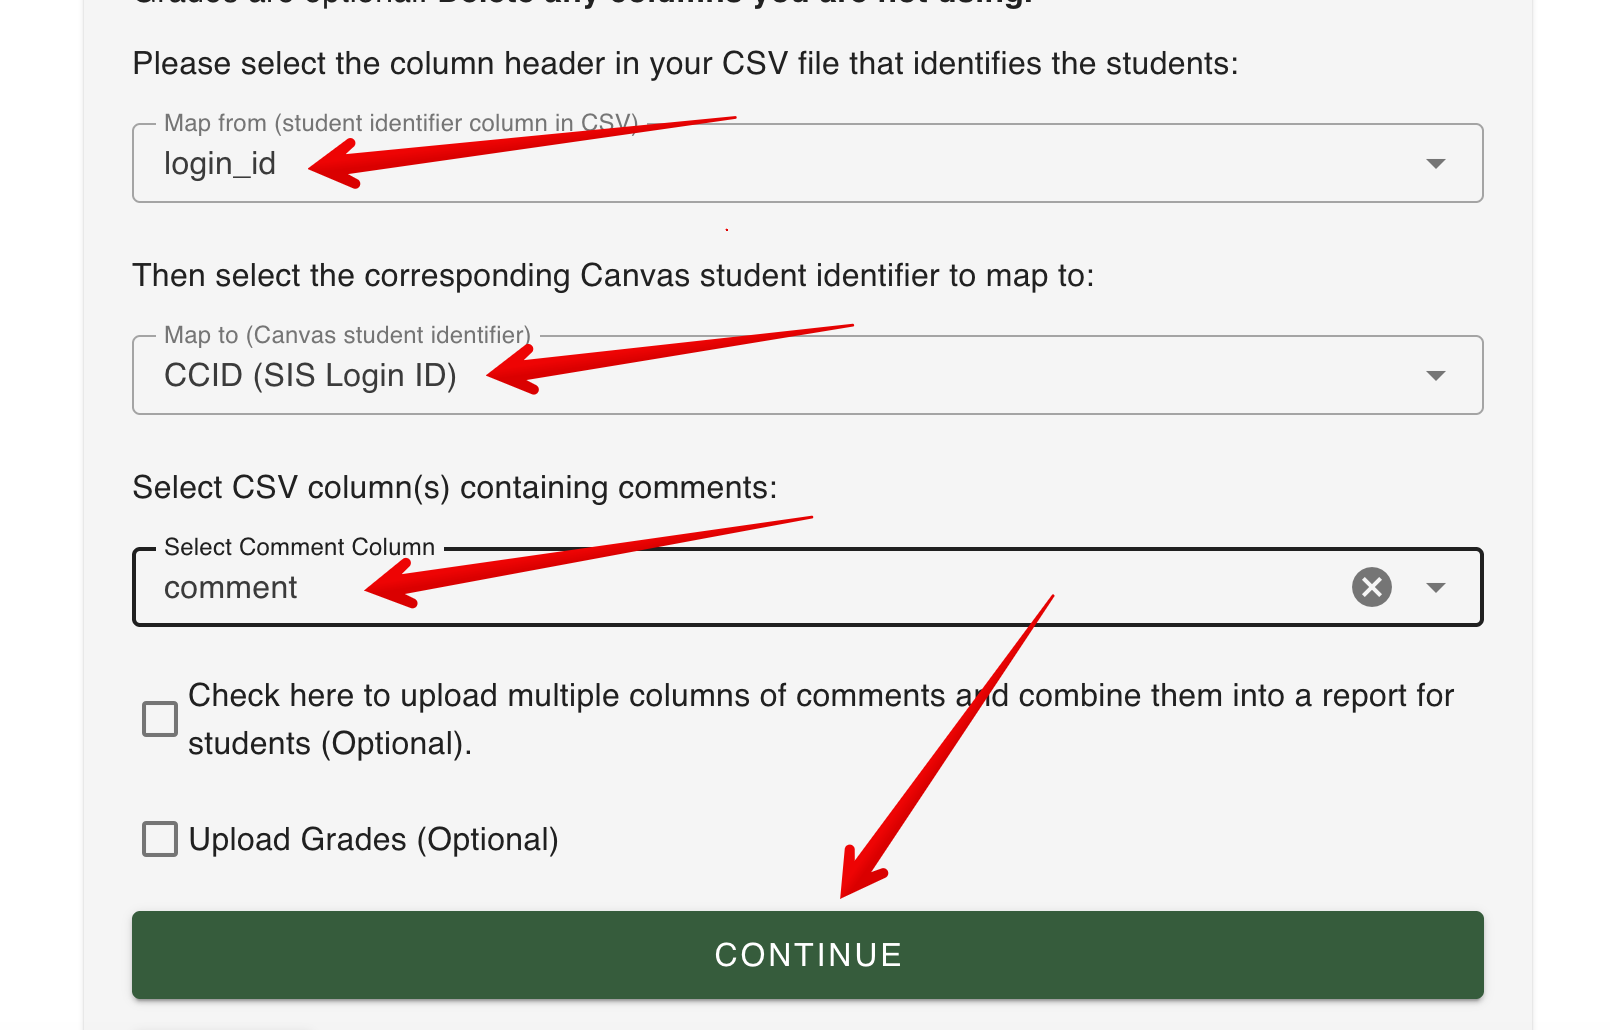
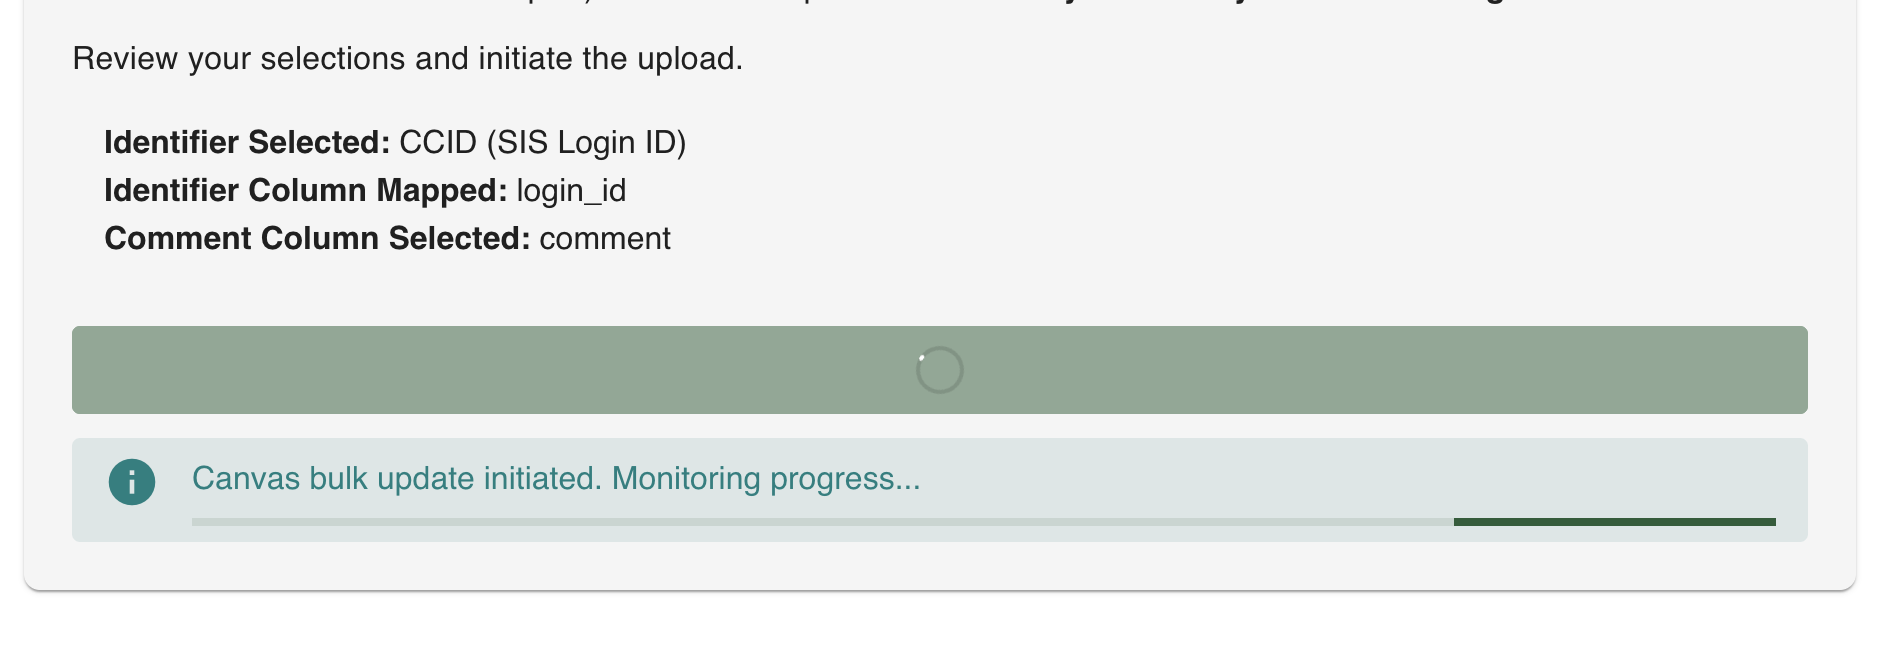
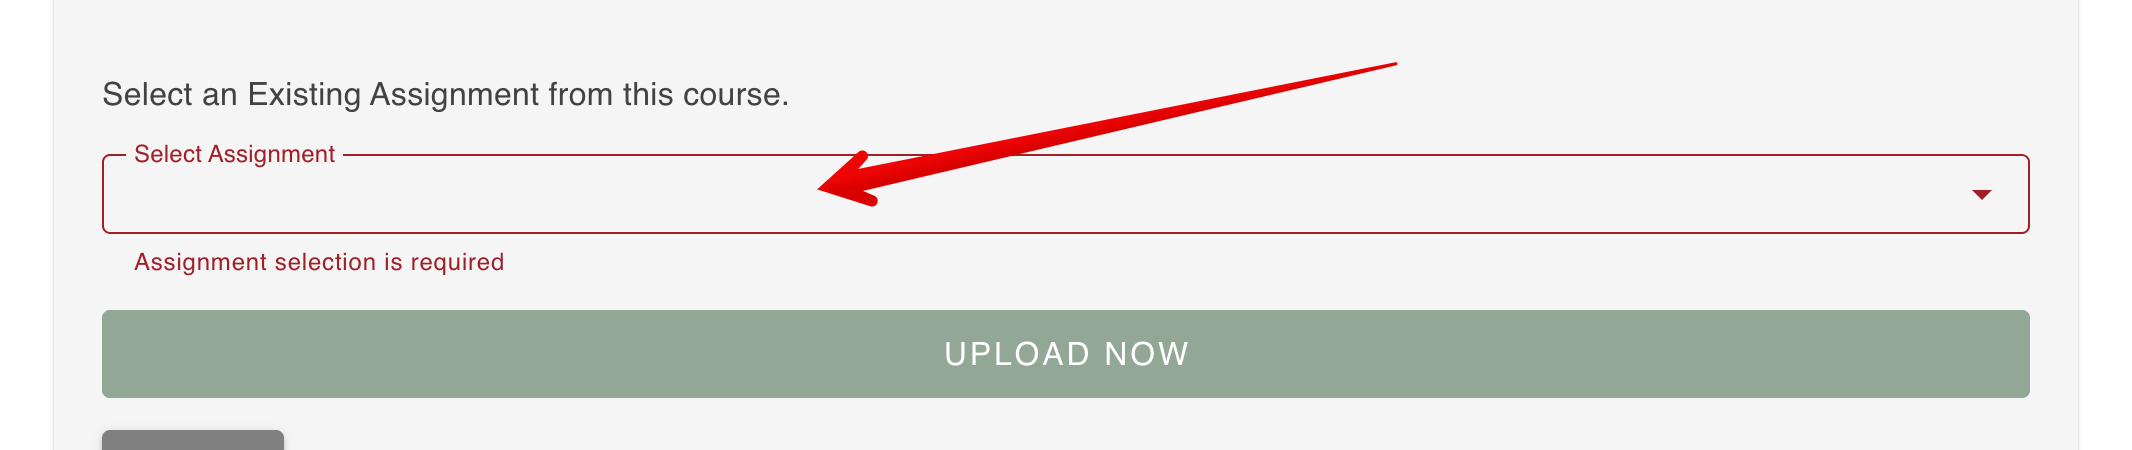
8. Any issues with the file will be identified at this stage but if the file is formatted correctly users will now have the option to map their csv columns to Canvas. First select the name of the csv column that identifies the students; then select the corresponding identifier from Canvas; then identify the column containing comments; and finally click CONTINUE:
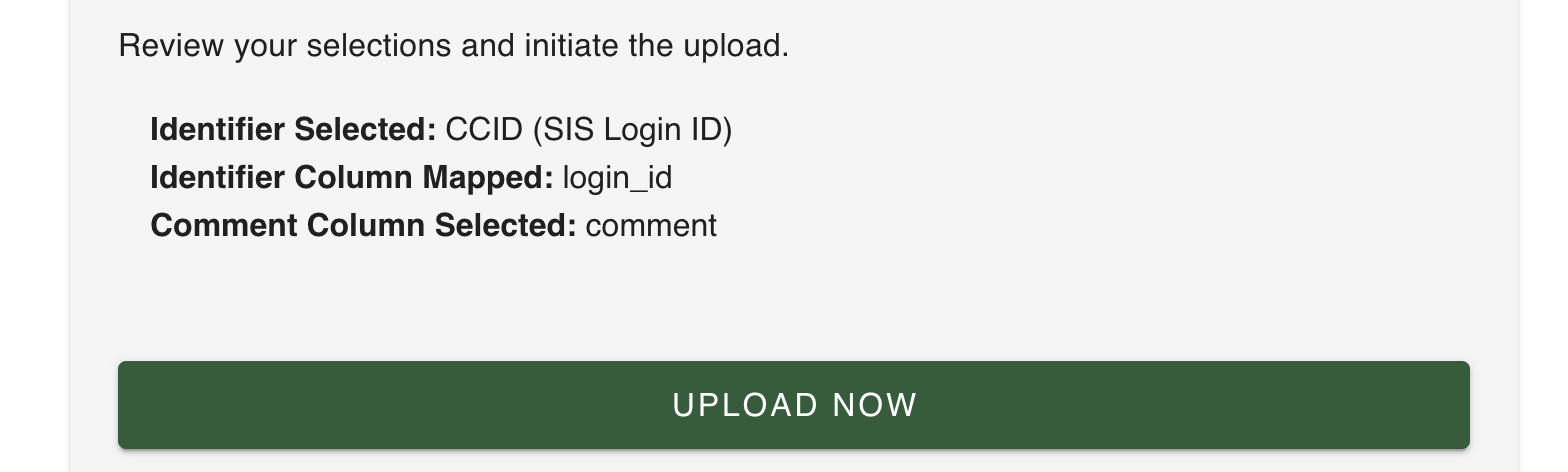
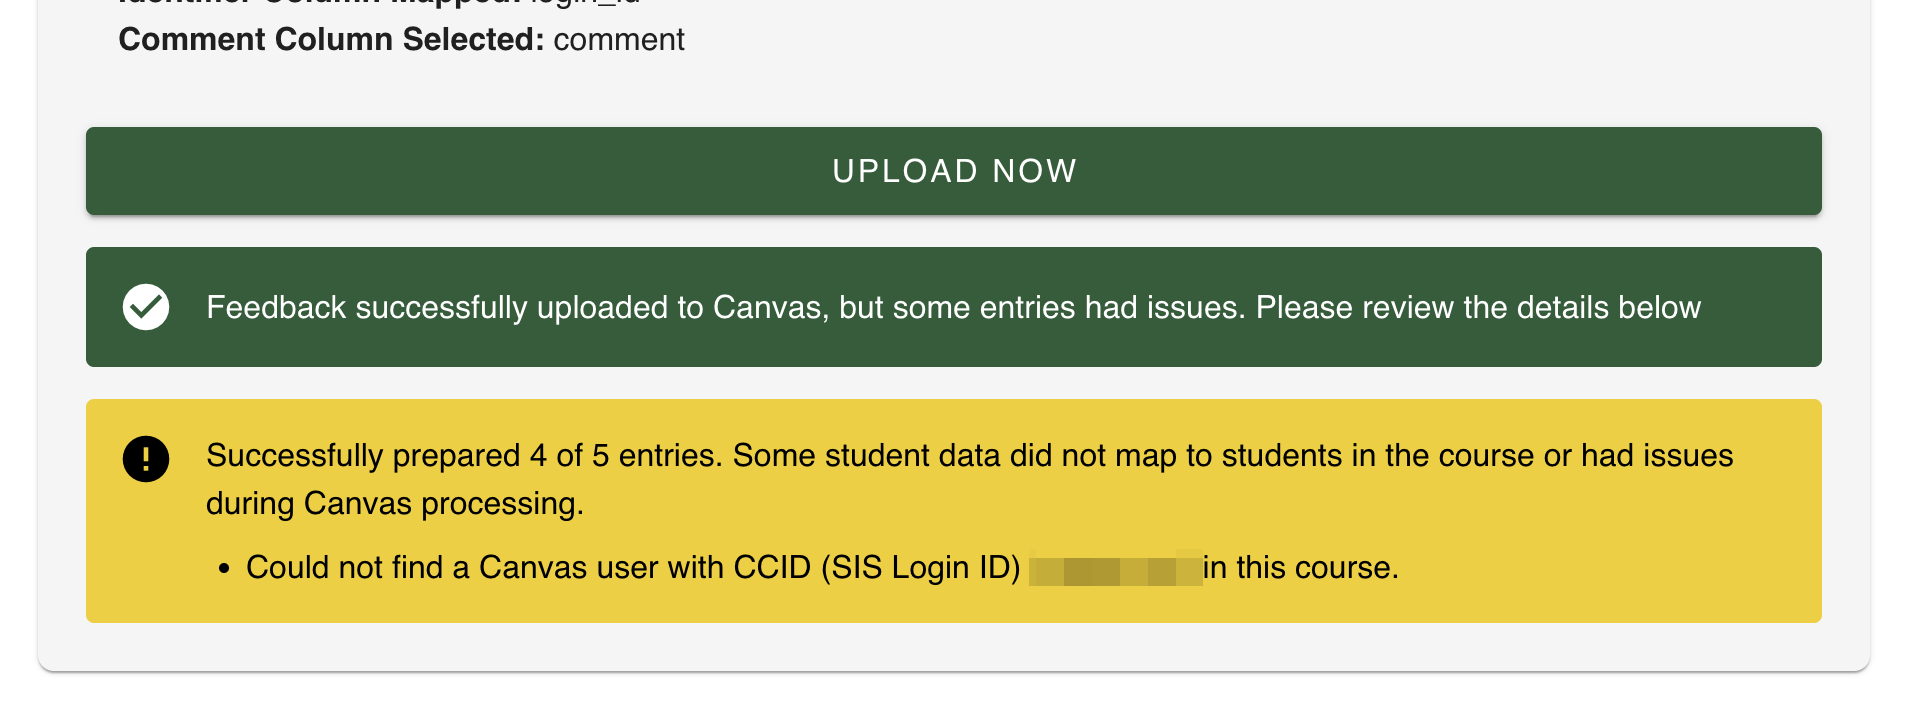
The page will display the identified mappings - if correct click UPLOAD NOW:
A progress indicator will appear:
9. Any mapping issues will be identified and if the file is formatted correctly, the comments will be uploaded:
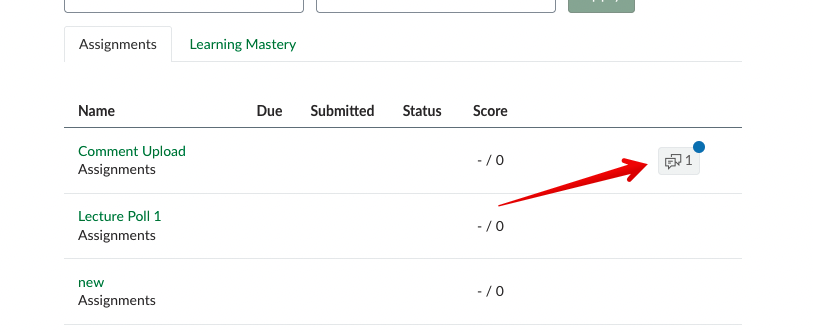
10. Students will be able to see their comments through the gradebook. Note: if the gradebook column has an automatic grade posting policy, students will immediately receive a notification of this grading event so instructors should confirm their grade posting policy first.
Use Case 2: Uploading Comments AND Grades into a New Grade ItemIt is also possible for instructors to upload both grades AND comments from an existing file into Canvas in this same workflow. A common use case for doing this would be for exams administered through TSQS which produces a single spreadsheet containing one column with grades and other columns with the scored responses or wrong answers. To do this, instructors need to follow almost the exact steps as for Use Case 1 shown above with 2 differences: 1. The prepared csv file must contain a column titled that contains the students scores in numeric format. An example file showing this looks like:
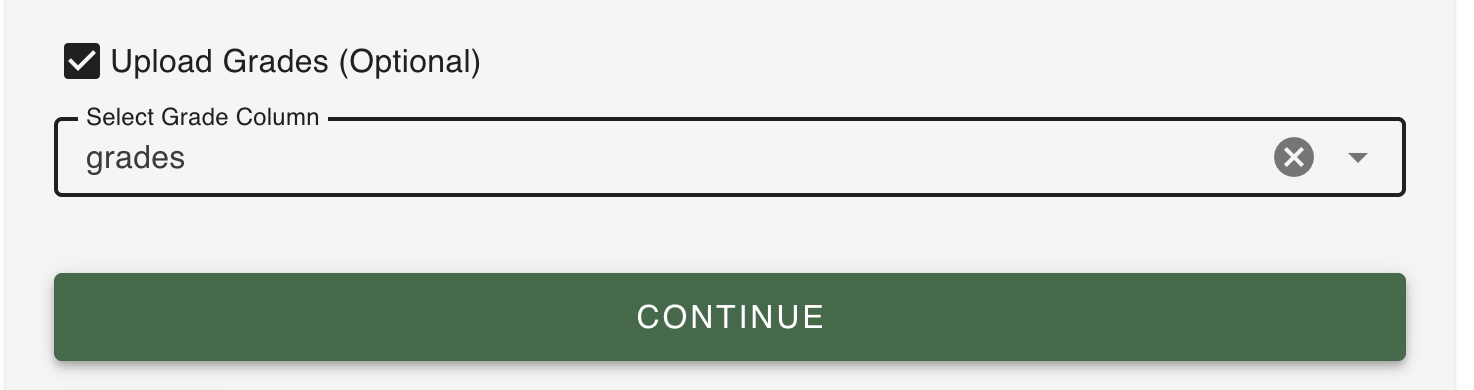
2. Once the file has been uploaded, then instructors need to check the box Upload Grades (Optional), identify the column containing grades in the csv file in the 'Select Grade column', and then click CONTINUE:
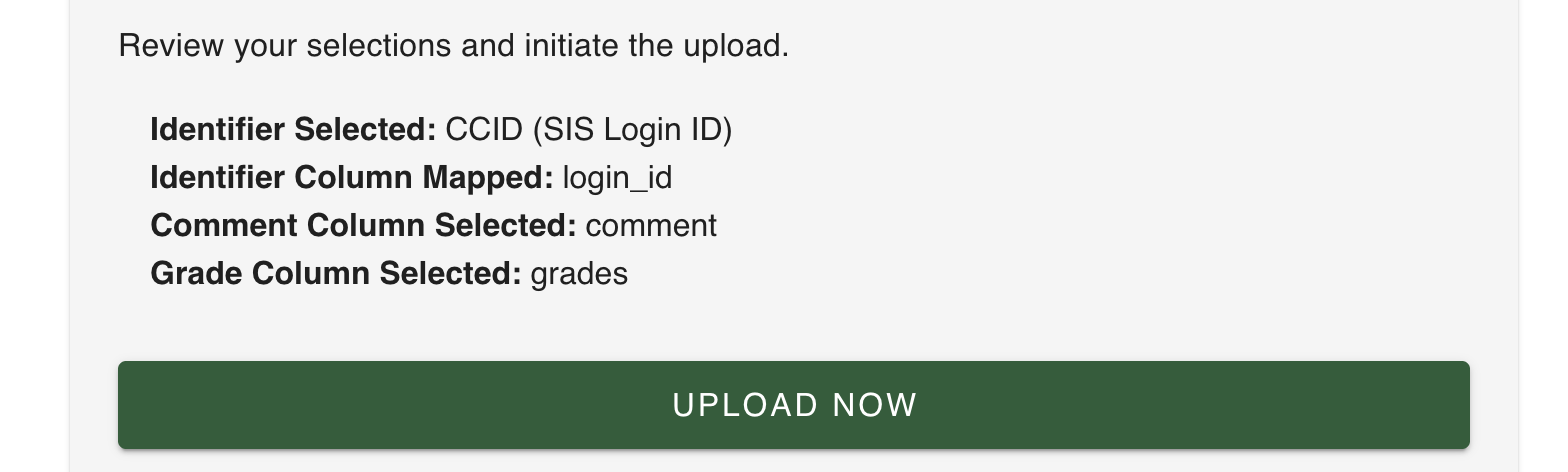
Review the selections from the csv file and click UPLOAD NOW:
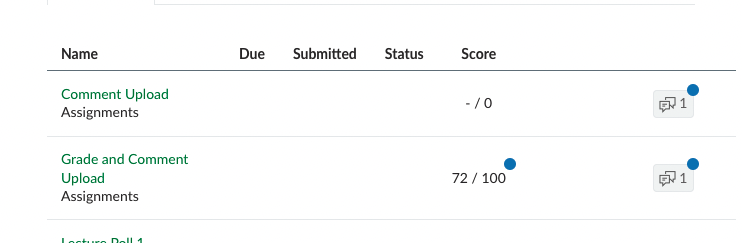
3. Students will now see the uploaded scores and the comments in their view of the gradebook:
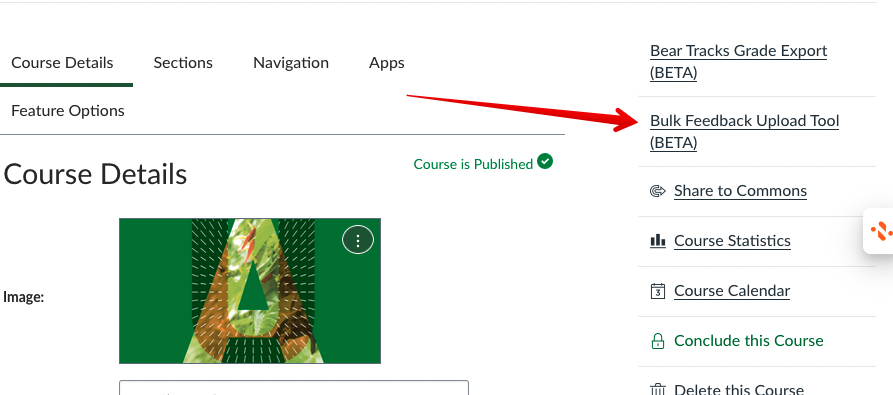
Use Case 3: Uploading Only Comments into an Existing Grade ItemUsing a different workflow, instructors can also bulk add comments to existing, grade items in Canvas. A potential use case might be to add additional text-based feedback on long form exams already graded in Canvas. This process is the same in terms of constructing the csv file but the upload is launched in a different way: 1. Access the settings area of the course and at the top right of the 'Course Details' tab, click Bulk Feedback Upload Tool:
2. This will open the bulk upload interface with the same interface to select the csv file:
3. Once a valid csv file has been uploaded, instructors will have the same view to map the column headers from their csv to canvas and optionally upload grades as well:
After clicking CONTINUE, there will be an additional dropdown to select the existing grade column:
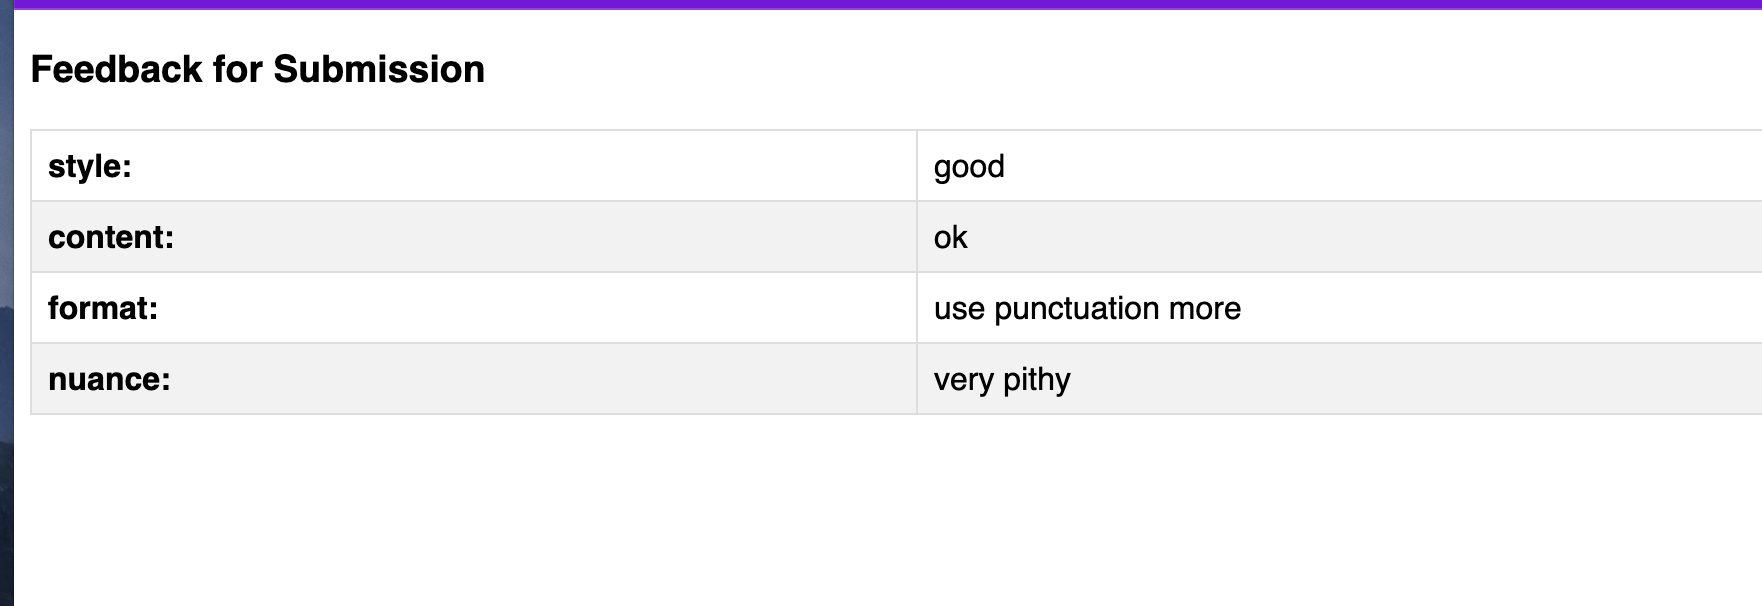
4. Once selecting the existing column, a review screen will show the options selected and if everything looks good, instructors can click UPLOAD NOW and students will then see their new comments (and grades if using.) Use Case 4: Bulk Uploading Multiple Comments into a report for studentsIf instructors have a number of comments that they want to give to students, they can structure these as separate columns in the csv and the bulk upload tool will parse these into a formatted file for student review. An example of this use case would be if a grading tool produced different feedback values for a series of criteria like a rubric. A csv file constructed this way might look like this:
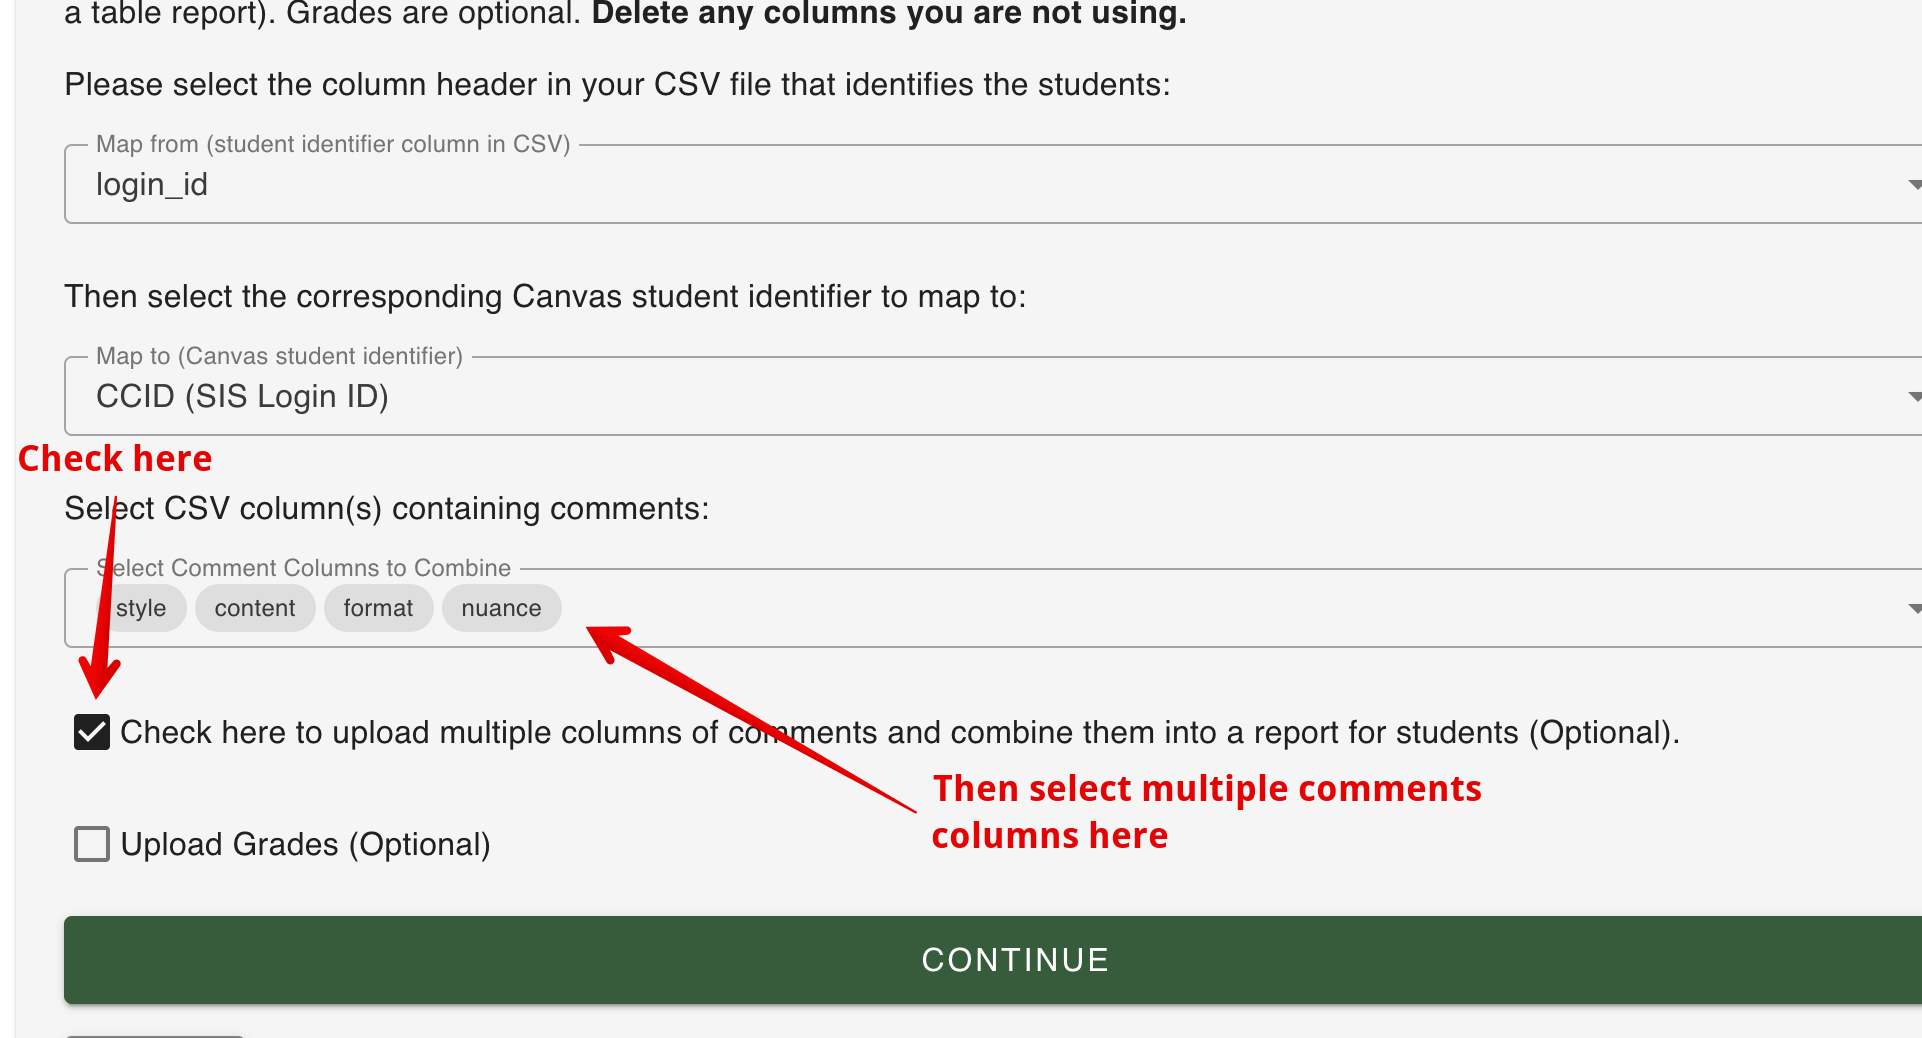
Instructors should set the student identifier column mappings and then below the comments dropdown, check beside Check here to upload multiple columns of comments. This will update the form to accept multiple columns from the csv:
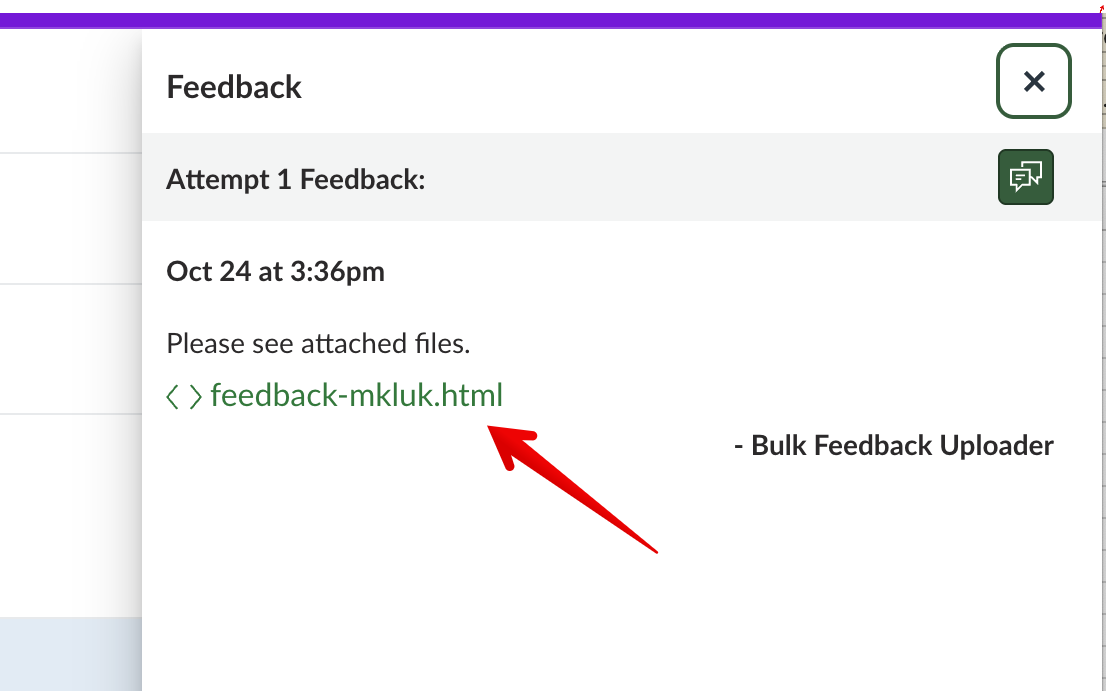
Once those are entered, click CONTINUE then UPLOAD NOW after validating the mappings. Students will now see an html file in their comments area for this assignment once a grade column is posted. Files can only be accessed through the student's gradebook view:
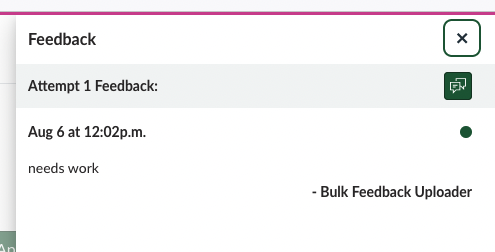
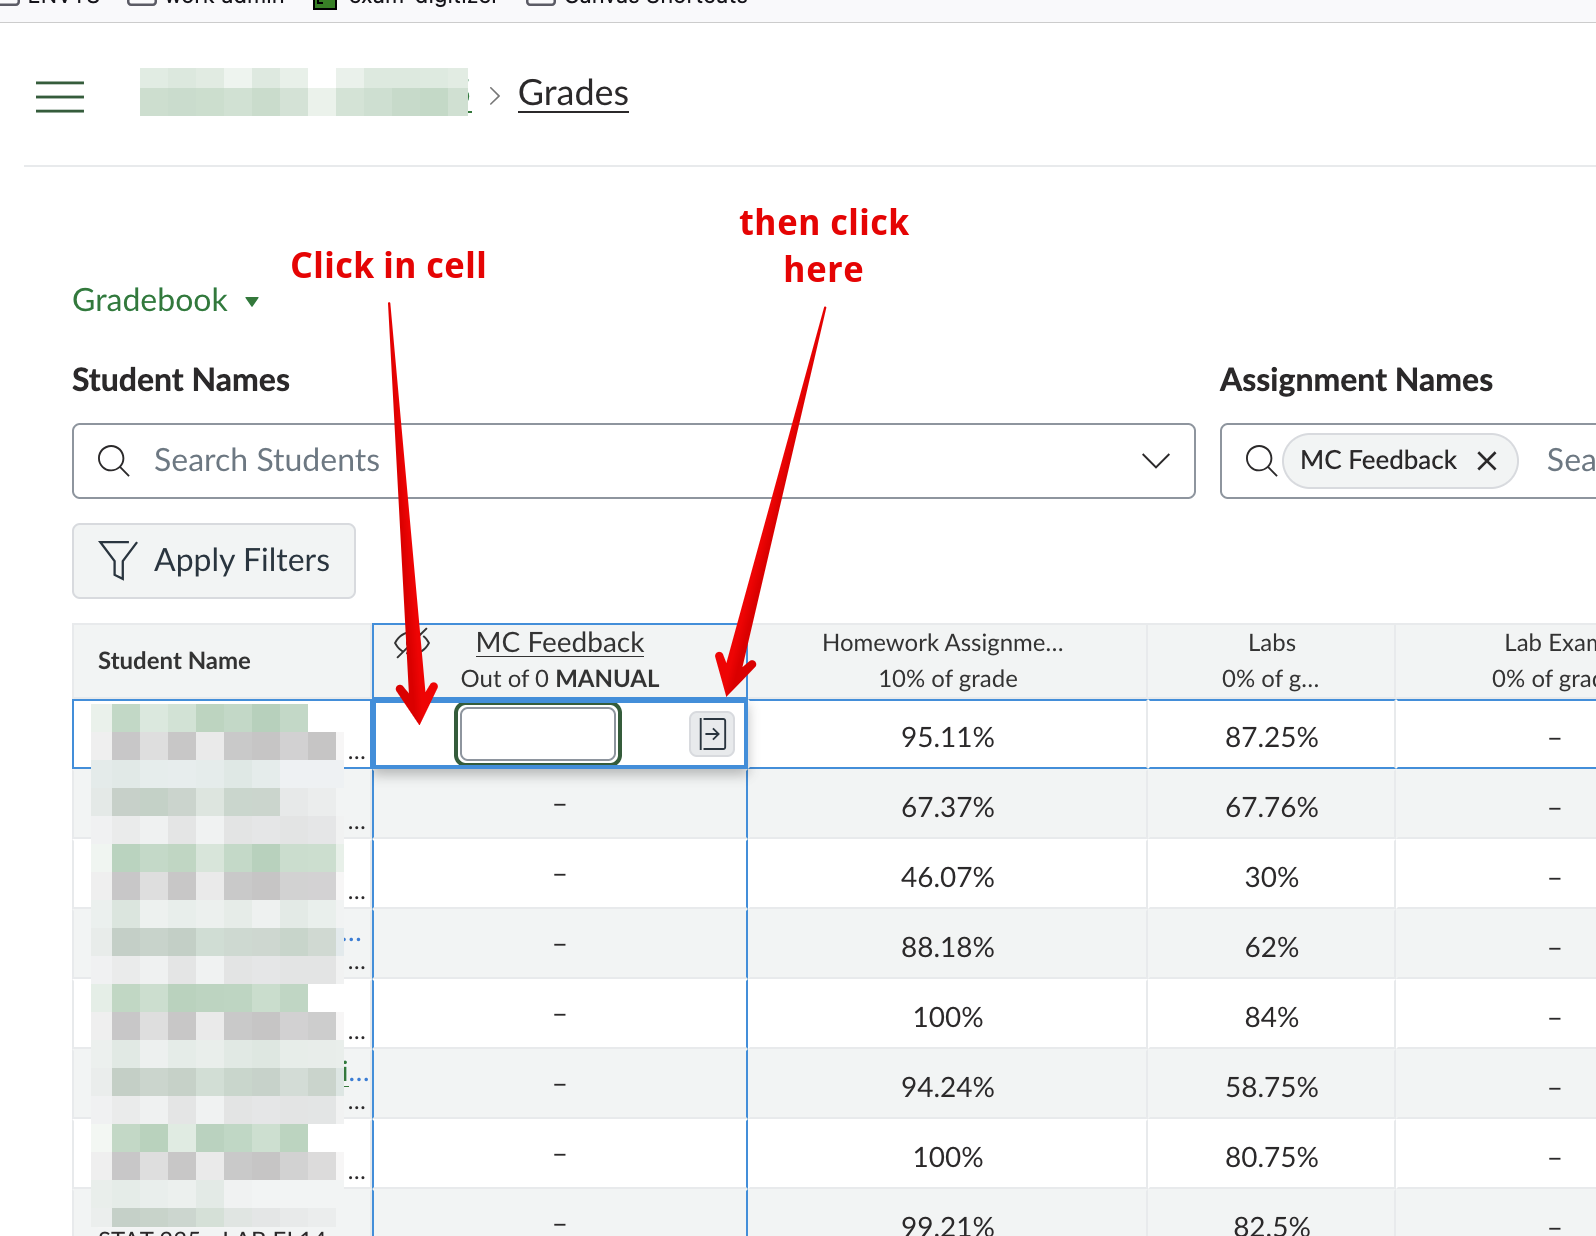
Viewing Bulk Uploaded Comments1. In your gradebook in the grade column where comments were uploaded, click on an active cell to reveal more interface functions. 2. Click on the icon showing an arrow in a box.
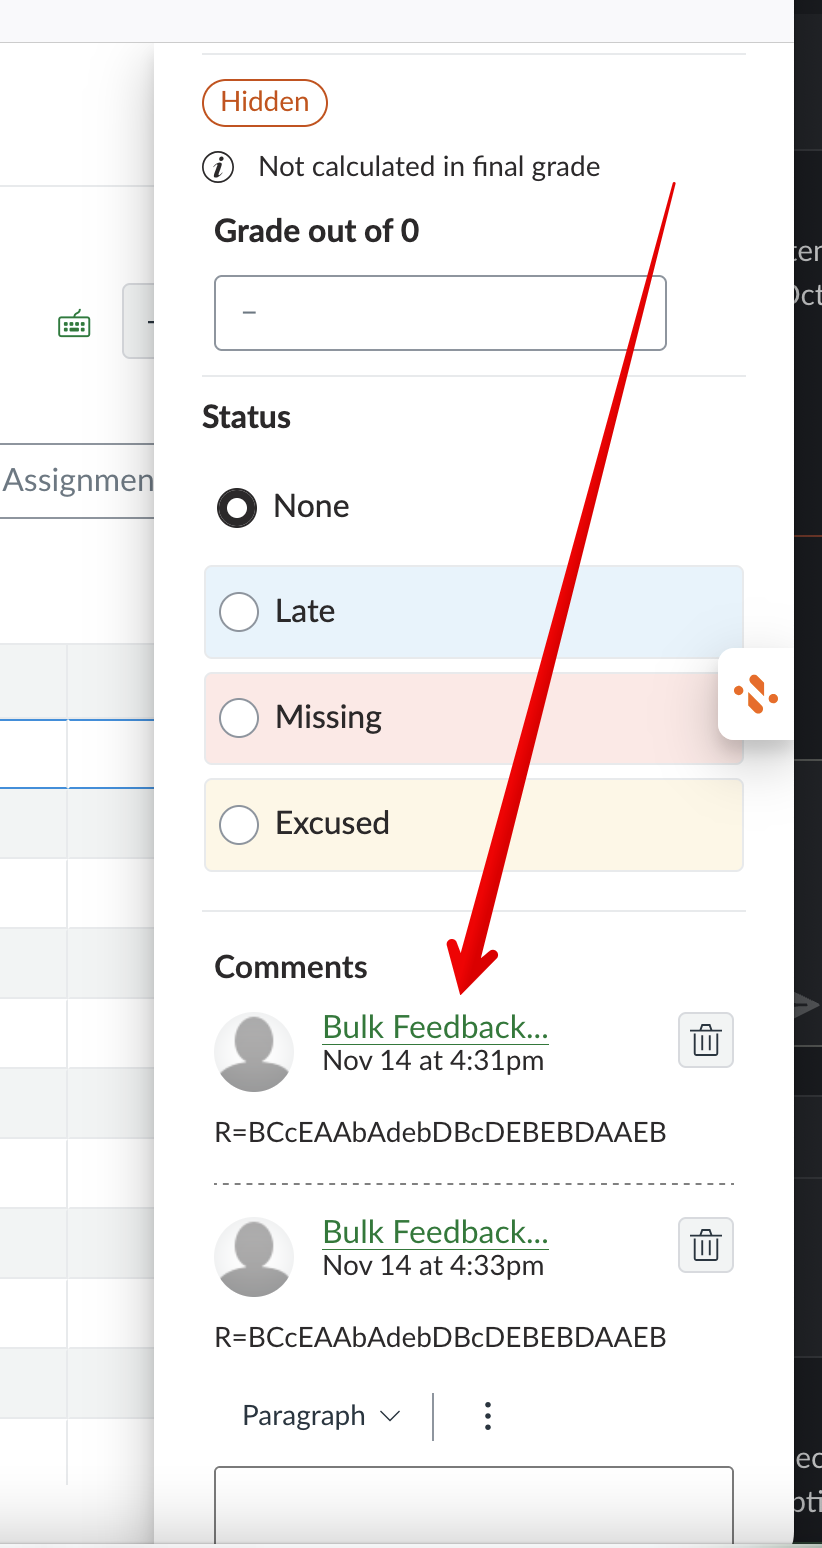
3. The quick grading panel will slide in from the right edge of your brpowser and the uploaded comments will be visible at the bottom under the 'Bulk Feedback Uploader' user account: | |
|
|
Knowledgebase: Canvas > Canvas for Instructors


Comments (0)