|
Recreating Tab Displays / Onetopic Course Format in Canvas
Last modified on 22 January 2025 08:59 AM
|
|
|
Users moving existing course content from the eClass/Moodle environment to Canvas may be seeking ways to recreate various hierarchical display methods for course content. Content moved automatically between systems will come across as a series of pages (found in the "pages" section of the course) that will need to be linked manually. When starting a new course, you can create pages to fully customize the way students see and access your course. While some instructors may like the default structure of canvas courses, others might prefer that the materials are presented in a more curated manner. "Course links" within pages allow you to easily link to any content in the course, including other pages. This article will demonstrate recreating the tab displays in a course previously using the Onetopic course format, linking them from a new course home page. These same instructions could be used to further customize the home page provided in the University of Alberta custom template. If you'd like more general information about creating pages in Canvas, please see the following Canvas documentation: - Instructor Guide - Pages These instructions are just one idea of how to approach navigation links and buttons; there's a virtually unlimited number of ways to design and format content. The built in icon maker tool might be of particular interest to instructors making navigation buttons: How do I create an icon using the Rich Content Editor Icon Maker? Instructors who are interested in extending the ideas here using html are invited to self-enroll in the Learn HTML course which provides a quick overview of leveraging some of Canvas built-in resources for easily adding polished features into courses. Contents:
Getting StartedFor this example, we've already created a set of pages in the Pages section of the canvas course: In this example, our main page will be called "general information", and we'll match our navigation buttons to the tabs in the previous eClass course:
Creating A TableFirst we'll add a 6x1 table to the top of our main page from the table menu, and enter the page names: In the table properties, we'll set a green background colour for our links (tip: The shade of Green used in the UofA template pages is #275D38, the gold colour is #F2CD00). We'll also set a border width of 10 pixels and the border colour to white (from the advanced section):
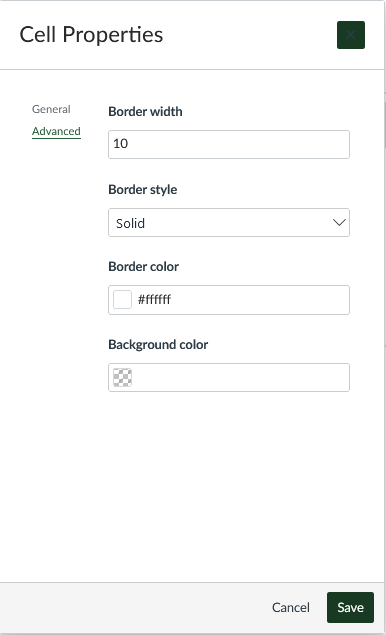
We'll also highlight the entire row, and edit the cell properties (in the advanced section) so that the cells maintain the 10px white border between them:
And with the text still selected we can set a text colour and center the text in the cells using the controls on the toolbar: Creating LinksNext we'll link the "Assignments" page by selecting the text, then clicking the Link button and choosing "course link." In the menu that appears on the right side, we'll find our "Assignments" page from the pages section. Tip: You can keep this menu open, select a different piece of text, then click its corresponding page in the Add menu so all of these pages can be linked in one step! The Zoom link in this example is a bit different. We just want to link to the Zoom LTI, which won't show in the Add menu so we'll copy it manually by right clicking it in the left-side navigation menu, then add it as an "external link."
We've now recreated the tabs from the eClass course page in our Canvas page.
Duplicating the menu across other pagesTo duplicate the menu on all of our course pages, we can edit the page again, open the html viewer, then copy everything between (and including) the <table> and </table> tags at the top, in this case the first 14 lines:
We can then edit the course's subpages, open the html view, and paste the code into each of them:
And we'll have a consistent navigation menu throughout:
Setting a main page and controlling navigationFinally, we can set our General Information page as the course's main page, so that it's the page students land on when they first open the course link. To do so, navigate to the Pages section, and find the "use as front page" option under the ellipsis (⋮) menu for the page. As well, ensure that all pages that you've linked are published (so that students can access them) and have a green check next to them: On the main course page (when you click "home" on the left side), find the "choose home page" button on the right side: and use this to set the front page we've just designated as the course's home page: If we want to ensure that students only navigate the course via the page links that we've set, we can optionally hide the other items from student view in the course settings, on the navigation tab: Now when we view the course page as a student, we can confirm that students will only see the paths that we've laid out through the course pages: | |
|
|
Knowledgebase: Canvas > Canvas for Instructors


Comments (0)