|
Importing Grades into the Grader Report
Last modified on 12 February 2024 10:27 AM
|
If your students have completed an offline activity (such as a midterm or final examination) and their grades have been published or recorded in a spreadsheet, it is possible to import these grades into eClass to publish them to students.
Once uploaded, students will only be able to view their own grades and you have full control over the format of the displayed grade. You also have the option to include textual feedback along with any numeric values you are uploading. Note: If you wish to import only textual information into your grader report, check this article instead: Importing Text Columns to the Gradebook.
A common time to import grades from a spreadsheet is when your exam has been optically scored by IST TSQS and they have provided you with a file containing the test results.
To import grades:
- First, ensure that your spreadsheet has been saved in a comma-separated variable format (file extension .csv also called comma-delimited format).
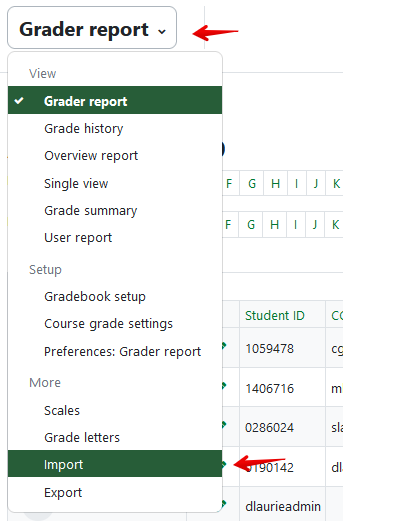
- Go to the Grade administration page by clicking on Grades tab at the top of your course page:

- From the Grader report dropdown select Import.
- Once you are on the Grade administration page, make sure you are in the CSV file tab, under the Import tab.

- On the 'Import File' page, drag-and-drop or choose the file you would like to upload in the 'Import File' area, leave all options as is, and click Upload grades.
- On the 'Import preview' screen, scroll down to the 'Identify user by' section. When importing student grade data, you can choose to identify students by either their (a) CCID, (b) 7-digit student ID number, or (c) anonymous ID (New in March 2018).
- To import student grades using CCIDs as the value for 'Map From', you will need to choose the title of whichever column that contains your students CCIDs in the file you are uploading. In the example depicted below (and in the standard TSQS optically scanned exam spreadsheet), this column is titled 'CCID'. Then, in the 'Map to' field, select CCID.

- To import student grades using 7-digit student ID numbers as the value for 'Map from', you will need to choose the title of the column that refers to your student's ID numbers in the file you are uploading. Then, in the 'Map to' field, select Student ID.

Note that by default student's 7-digit ID numbers do not appear as a column in the gradebook (even though you are still able to match incoming grades on that value). You can optionally choose to include them in your course's gradebook using the instructions in this article: Viewing Student IDs in the Grader Report.
- To import grades based on student's Anonymous IDs (new March 2018), the spreadsheet file will be most likely be coming from a 3rd party homework website and students should only be identified by the anonymous ID. The 'Map from' value will be the column header for the Anonymous ID and the 'Map to' will be Anonymous ID:

- After you have identified your users' data, you will need to map the grades data to an existing column or create a new one. In the 'Grade item mappings' area, match the items to the left (fields from your imported file) to specific columns in your gradebook by choosing the appropriate values from each drop-down menu. You should ignore any fields that are student identifiers (first name, surname, etc.). If you wish, you can also upload additional fields as comments for the students by selecting an import column and matching it to the item 'comments for xx' for the particular column, 'xx'.

When ready, click the Upload grades button.
- After clicking the Upload grades button, you should receive a message: 'Grade import success'. This tells you that the grades have been successfully loaded into the grader report. Click Continue to return to the Grade report and view the grades.
Notes:
- Importing grades into the column independently of comments will overwrite any existing comments in the grade column with empty values. Comments can be imported after adding grades without issue.
- You can only map one column into the comments field associated with a given grade item. If necessary, you can combine columns in your csv spreadsheet and then upload them into a single column using the instructions in this article: Combining Multiple Comments into a Single Grade Item.
- If you are running into issues with the import, please consult the article on diagnosing common grade import problems: eClass: Troubleshooting Grade Import Issues.
|
 (148 vote(s)) (148 vote(s)) Helpful Not helpful
|