|
Creating In-Class Paper (PDF) Exams to be Graded Online Using Assign2
Last modified on 12 September 2023 08:27 PM
|
|||||||||||||||
|
Instructors can use Assign2 to grade exams or assignments completed by students on paper in class. The streamlined grading workflows in Assign2 can make this a time-saving method for delivering in-person, long-form assessments or exams. Contents:
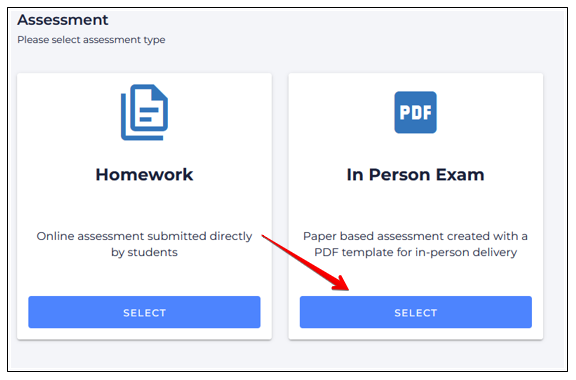
The starting point for this type of assessment is to have the questions prepared in an existing PDF template file. 1. With that in hand, instructors should begin by following the steps for adding an Assign2 tool to their course, ensuring that the 'Grade' points selected matches what the eventual points total will be for the assessment. Once the tool has been added, click the tool link in the course and select In Person Exam:
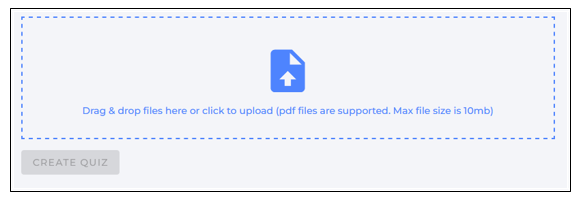
2. Next, upload the PDF version of your exam file by drag-dropping or browsing. This file should contain all the questions and space for students to complete their answers as in this example file (used in the screenshots below):
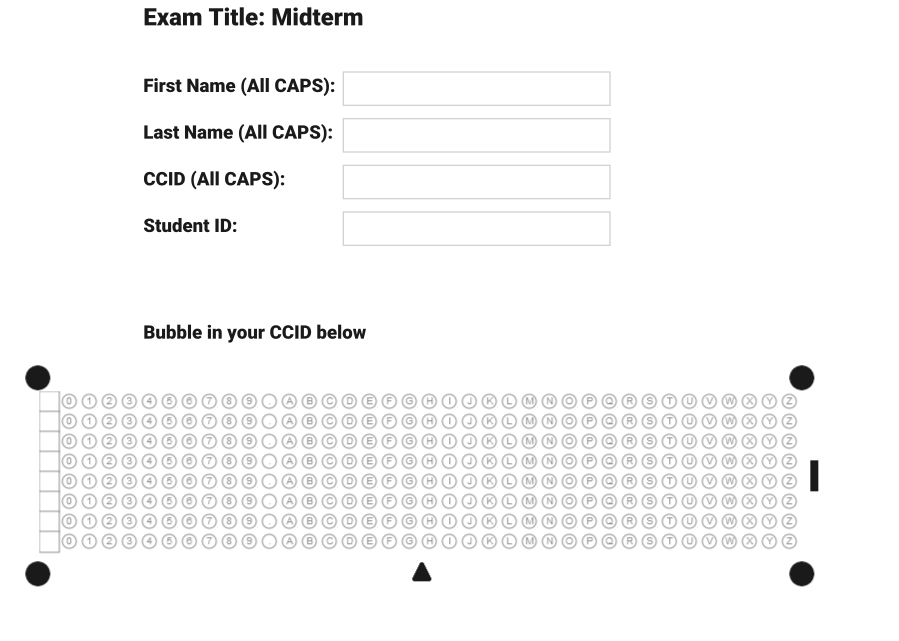
3. Once uploaded, the PDF is opened in a preview mode that first shows the cover page for the eventual student copies:
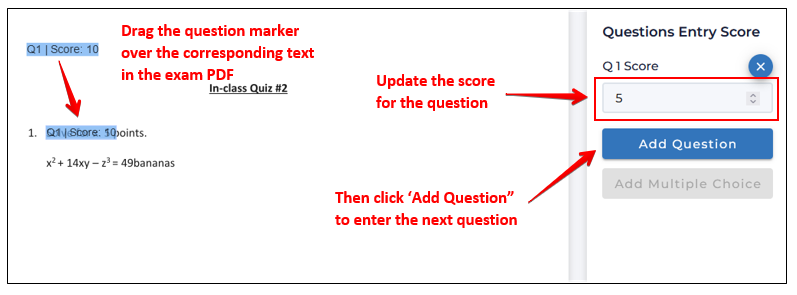
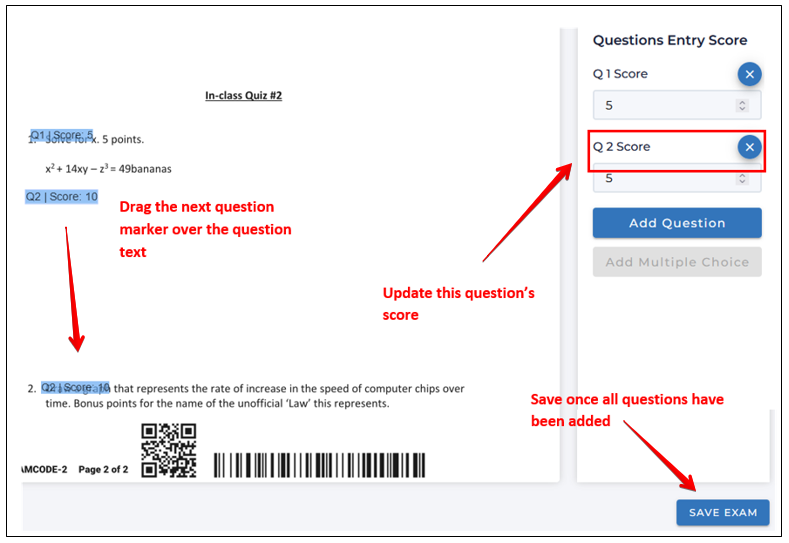
4. Scrolling down, instructors will then create the question placeholders to be linked to the Assign2 grading interface. To add a question, click Add Question then drag-and-drop the blue question marker over top of the question in the underlying template, then enter the point-value for the question to match the assessment item:
5. Then repeat this process for every question in the assessment and once complete, scroll down and click Save.
Printing and Distributing Assessments to Students: To provide an assessment to students, instructors must now download and print copies for their students. When printing, instructors should:
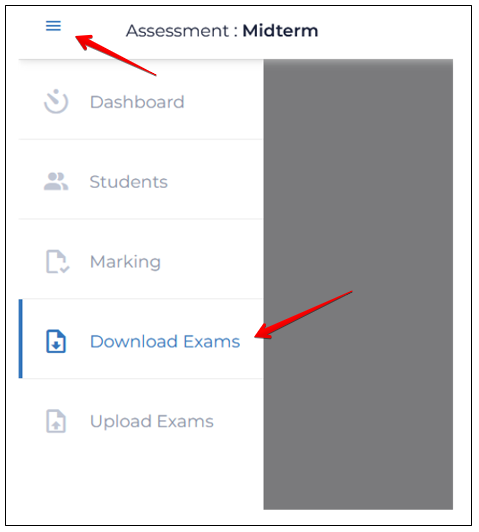
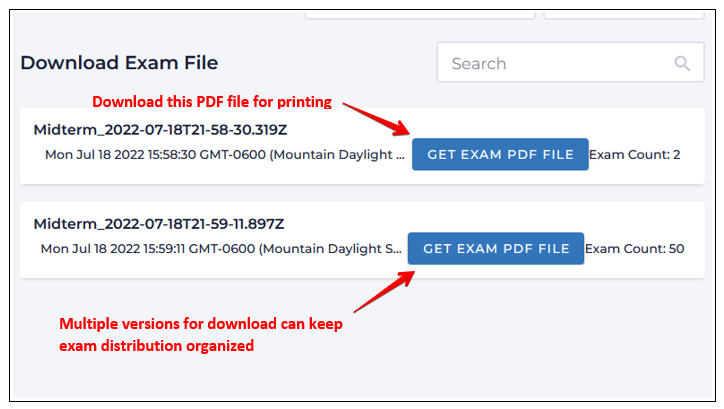
Important note: if an assessment is meant to be a 2-stage or group exam, this must be configured BEFORE the step below where any of the exams are generated. For more details see Delivering Group Paper (PDF) Exams Using Assign2. 1. From the dashboard page, open the left nav menu using the icon at the top left, then select Download exams:
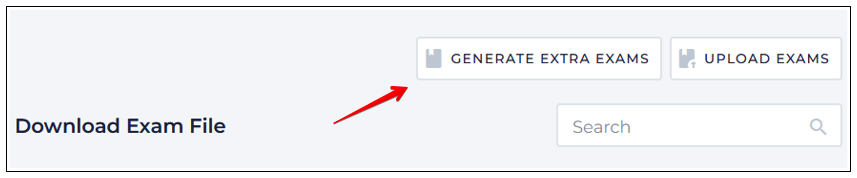
2. Click Generate extra exams:
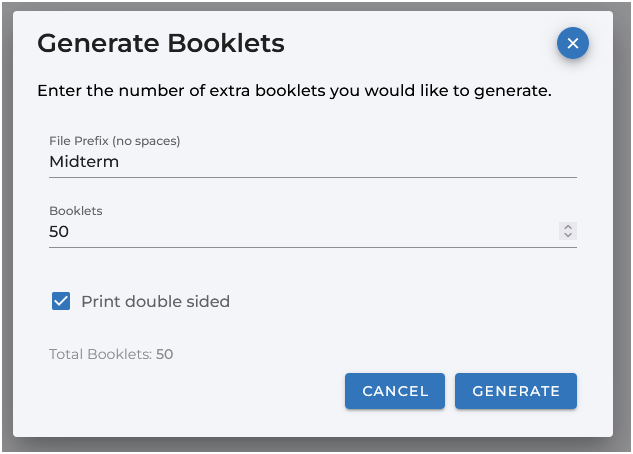
3. On the 'Generate Exams' overlay, specify a file prefix and enter the number of exams required for printing, then click Generate:
4. This will produce a single zip file that can be downloaded and printed in a single job, creating the specified number of copies. This operation can be performed as many times as required - eg. for students in different sections, for students completing deferred exams, etc. Using a different file prefix for these cases can be useful in keeping the various printed versions separate. Note that the printed copies generated from exam file can only be used once - the barcode printed on each exam is how the system identifies and collates scanned, completed copies and associates them with the students who have completed them):
5. Once printed, these exams would now be given to students in-class who will fill in their name, CCID, and student ID number on their copy and complete their assessment:
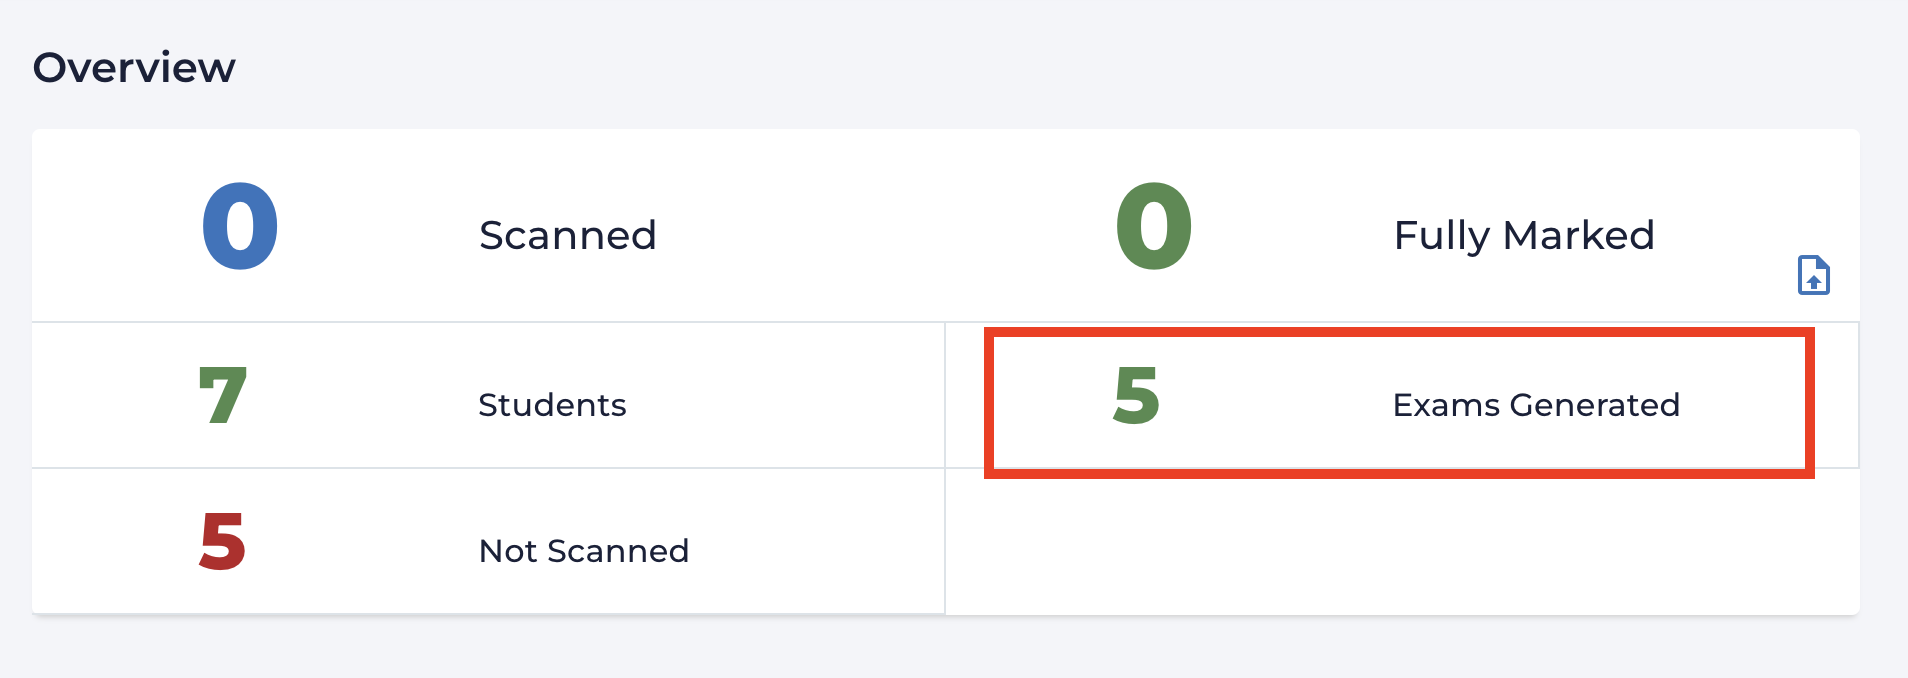
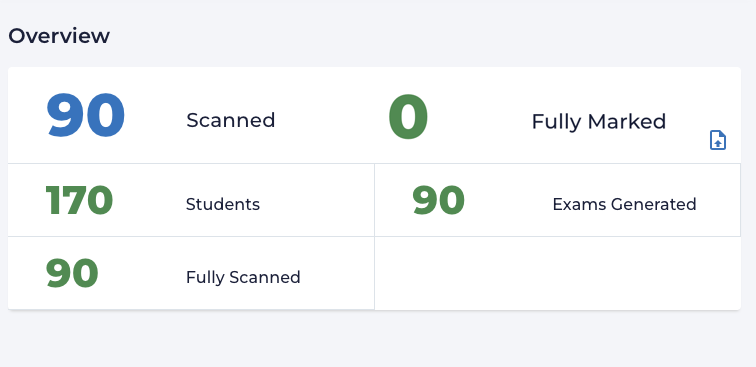
Once exams have been created and generated these counts will be added to the assessment dashboard to the right of the count of students in a course:
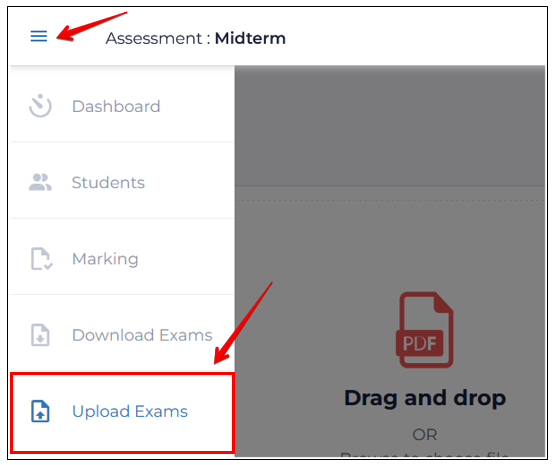
Scanning and Uploading Assessments: Once the student's completed work has been collected, instructors will need to scan and upload the paper copies for grading: 1. Scanning can be completed using standard office printer/scanners including continuous feed devices that output single PDF files. Scanning should occur at 200dpi resolution or higher and should be done on a darker setting. The resulting PDF file containing any number of individual student copies can be uploaded by opening the left nav menu via the icon at top left, then selecting Upload exams:
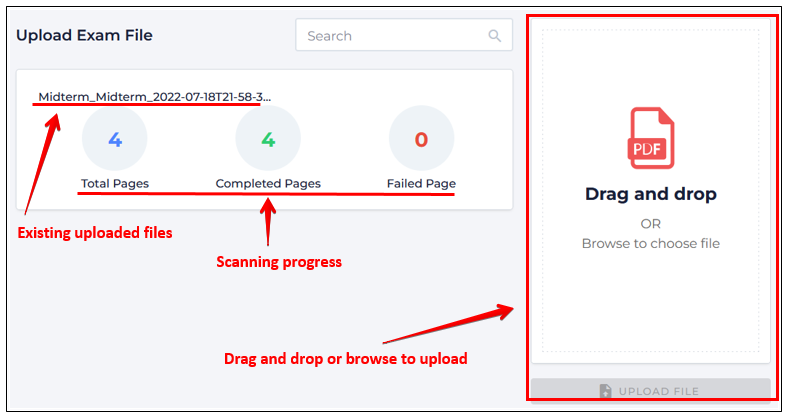
2. PDF files can be drag-dropped (or selected by browsing) through the dialog on the right. Please note: this process can be completed as many times as required based on the different scanned files. Once Upload is clicked, files are added to the files list on the left and the system begins processing them with progress tracked in the center:
3. Once the upload has finished scanning, the upload counts will be added to 'Fully Scanned' counts on the dashboard:
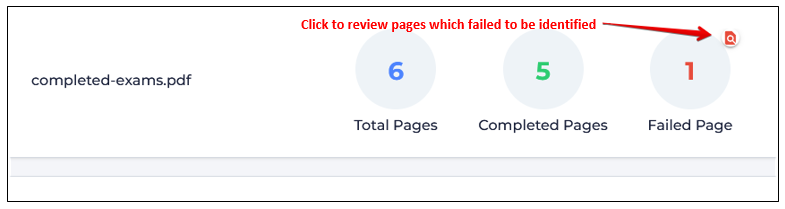
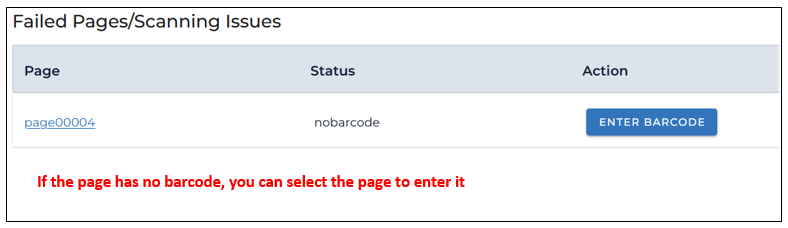
Scanning problems will be identified either from: 1. the Upload Exam File tab - from the Upload Exam File tab, open the failed pages interface by clicking on the document icon:
2. or from the main Dashboard - from the Dashboard, open Partially Scanned:
Dealing with Partial Exam Uploads: Images of any scanned but unmatched problem pages can be reviewed by clicking their link to try and resolve any issues manually by clicking the Partially Scanned icon. This page list all of the scanned pages for any incomplete or partial exams with a list of all pages within each specific exam also displayed, allowing the identification of any missing pages. Clicking on the page name will display a specific page if further review is necessary. You may have to go back to the original paper exam to verify the student and the associated exam:
Enter the barcode, and click Process Page:
1. If students don't correctly bubble in their CCID, their exams can be manually associated with their eClass student account by clicking the link for Not Assigned: 2. To link unassigned exams to particular students, the completed exam is displayed in a preview window. If an exam author can be identified, select their name from the dropdown list and click Assign Exam:
The Assign2 grading interface is accessed through the top left nav tray by clicking Exam Marking. Any exams that have ANY of their pages scanned will show up in the grading interface. The grading functions and workflows are the exact same as for online Assign2 assessments:
If multiple choice questions have been added to the students answer sheets, these are scored automatically. The dashboard allows instructors to see their grading progress at a glance and overall details about their assessment:
Specific count details:
| |||||||||||||||
|
|
|||||||||||||||
Knowledgebase: Online Assessment


Comments (0)