|
Adding Files
Last modified on 15 August 2025 02:55 PM
|
NOTICE: Please be advised that the content of this article may only be relevant for users concluding the final stages of course work on eClass or for users on the eClass External system. The eClass Learning Management System is currently in a read-only state that prohibits new courses, enrollments, and users from being added to the site. Credit courses and co-curricular courses at the UofA are now being delivered on Canvas, and full articles on how to use Canvas can be found here.
Files are one of the basic and most used types of content in eClass courses. When adding files, PDF files are usually preferable to other formats since browsers display PDF files in a consistent format. For a bit more information on general course content please see Preparing Content for Upload into eClass.
There are 2 main mechanisms for uploading files into eClass.
Adding Files by Dragging and Dropping
1. Click on Edit mode at the top right of your eClass page.
2. Find the desired file on your computer.
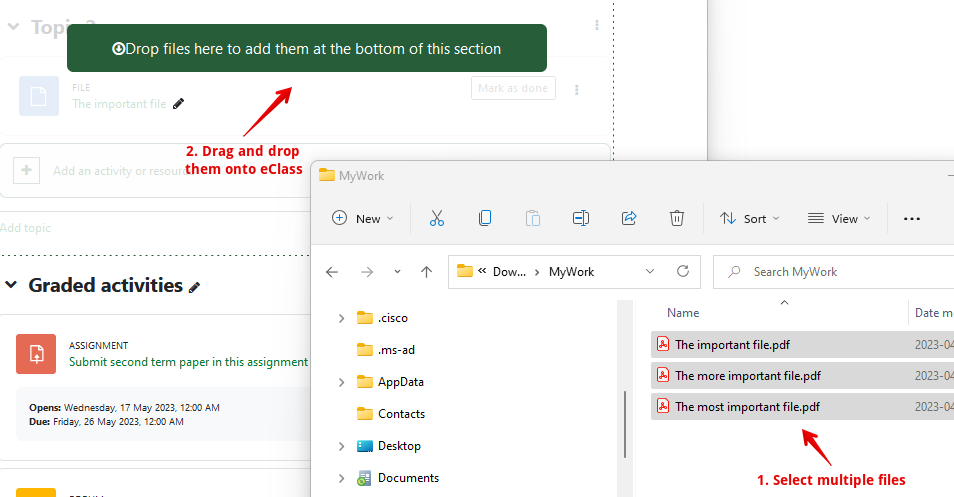
3. Click the file then, drag-and-drop it toward any topic area where you wish to add content.
You will see a message in the topic area, 'Drop files here to add them to the bottom of this section'.

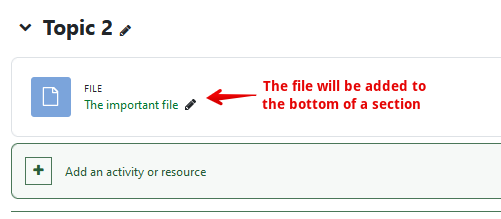
4. Once you have dropped your file, it will be listed at the bottom of the Topic where you dropped it.
,
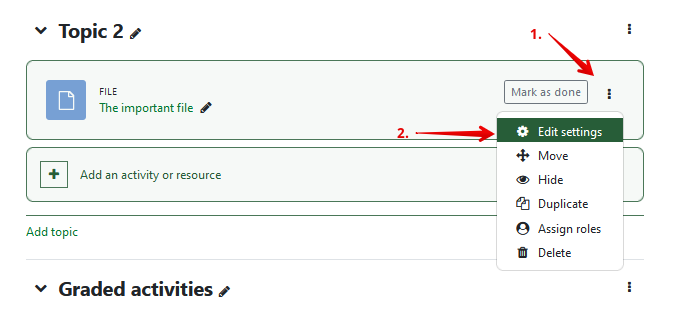
5. If you need to edit the file settings, click on the 3dot dropdown to the right of the file and click on Edit settings.
6. You can add drag-and-drop multiple files at the same time. Simply highlight all of the desired files, and then drag-and-drop them together.
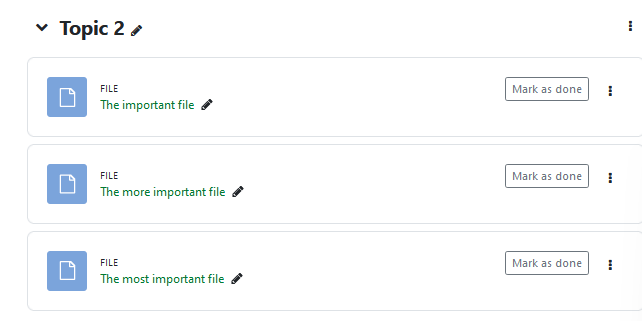
7. Multiple files will display at the bottom of the Topic:
Additional Notes
- Dragging-and-dropping images into your course will give you the option to either upload it as a downloadable file resource or to embed it directly into your eClass page for viewing.
- You may notice that you can add multiple files when you add a single file resource - normally only one of these will show up. The reason is that some uploaded files require "hidden" companion files, for example, if you were uploading a web page with embedded files (you would only want the web page to be visible as a file). If you are in this situation, make sure you set the HTML primary file as the default file by clicking on the desired file in the Select files interface and then selecting Set main file at the top of the pop-up.
- Otherwise, if you wish to upload multiple files and have them all visible to students, you should upload the files individually or into a Folder.
Adding a File Resource through the Activity Chooser
1. Click on Edit mode at the top right of your eClass page.
2. Move to the topic area where you wish to add content (the week, unit, etc.) and click on the Add an activity or resource link.
3. Click on File and a new page will open with the file activity settings:
Settings
General
- "Name" is required. Make this as meaningful as possible for your students.
- "Description": Optional provides explanation and instructions for your students.
- "Display description on course page": The description of your file will be displayed on the course page below the link to the file.
- "Select files": You may upload the file(s) here.
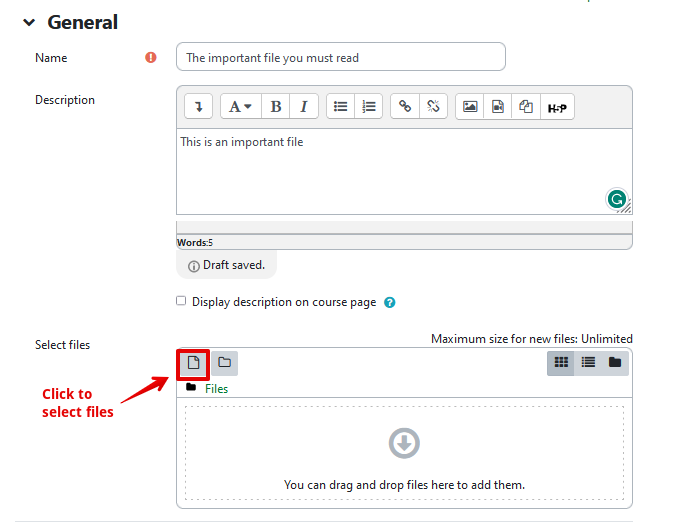
4. Click the file selection button above then browser to find the file you want on your computer.

5. Your file will show in the file settings:

Appearance
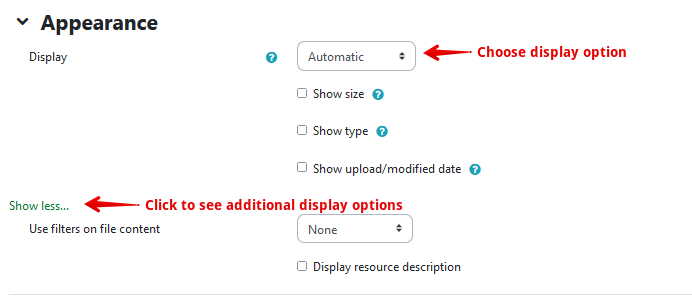
- 'Display': Together with the file type and whether the browser allows embedding, determines how the file is displayed.
- 'Automatic' - The best display option for the file type is selected automatically.
- 'Embed' - The file is displayed within the page below the navigation bar together with the file description and any blocks.
- 'Force download' - The user is prompted to download the file.
- 'Open' - Only the file is displayed in the browser window.
- 'In pop-up' - The file is displayed in a new browser window without menus or an address bar.
- 'In frame' - The file is displayed within a frame below the navigation bar and file description.
- 'New window' - The file is displayed in a new browser window with menus and an address bar.
- "Show size": Displays the file size, such as ‘3.1 MB’, beside links to the files. If there are multiple files in this resource, the total size of all files is displayed.
- "Show type": Displays the type of the file, such as “Word Document”, beside links to the file. If there are multiple files in this resource, the start file type is displayed. If the file type is not known to the system, it will not display.
- "Show upload/modified date": Displays the upload/modified date beside links to the file. If there are multiple files in this resource, the start file upload/modified date is displayed.
- Different addiitonal display options will appear depending upon the initial 'Display' option chosen
- "Pop-up width (in pixels)": You may enter the pop-up width here, provided that the ‘In pop-up’ option for the display is enabled.
- "Pop-up height (in pixels)": You may enter the pop-up height here, provided that the ‘In pop-up’ option for the display is enabled.
- "Display resource description": Toggles whether or not the resource description will be displayed, provided that either ‘Automatic’, ‘Embed’, or ‘In frame’ is enabled for the display.
- "Use filters on file content": Select ‘All files’ or ‘HTML files only’ according to your file types.
Common module settings
- "Availability": This setting has 3 options:
- 'Show on course page' - The activity is available to students (subject to any access restrictions which may be set).
- 'Hide from students' - The activity is only available to users with permission to view hidden activities (by default, users with the role of teacher or non-editing teacher).
- 'Make available but now shown on course page' - A link to the activity must be provided from elsewhere, such as from a page resource. The activity would still be listed in the gradebook and other reports.
- “ID number": An ID number identifies the activity for grade calculation purposes.

Restrict access
Tags
|
 (4 vote(s)) (4 vote(s)) Helpful Not helpful
|
