|
Adding Questions and Editing Quizzes
Last modified on 18 August 2025 04:47 PM
|
|
|
NOTICE: Please be advised that the content of this article may only be relevant for users concluding the final stages of course work on eClass or for users on the eClass External system. The eClass Learning Management System is currently in a read-only state that prohibits new courses, enrollments, and users from being added to the site. Credit courses and co-curricular courses at the UofA are now being delivered on Canvas, and full articles on how to use Canvas can be found here.
This article explains how to add quiz questions to an existing quiz on eClass. If you have not yet added a quiz, please see Adding Quizzes. Contents:
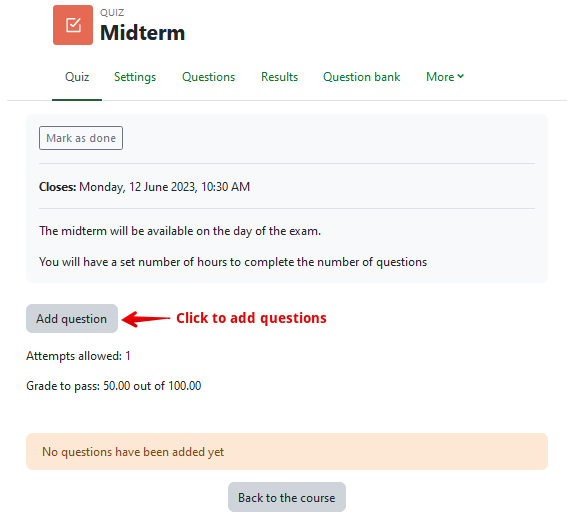
1. After adding and setting up your quiz, you can start adding questions by clicking on the quiz activity on your course page. 2. If no questions have been added to your quiz, you can add questions by clicking the Add questions button:
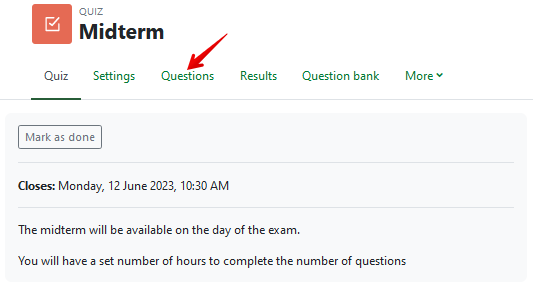
3. Once questions have been added, to edit an existing quiz, click on the Questions tab to open the editing page. From this page, you can add, remove, or modify questions.
4. Please note that once one or more students have attempted the quiz, you will no longer have the option to add or remove questions, which will ensure a consistent experience for all students taking the quiz.
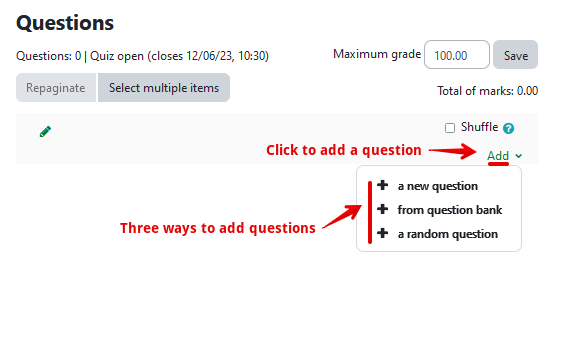
There are 3 ways to add questions to your quiz. 1. To begin adding a question to your quiz click on Add.
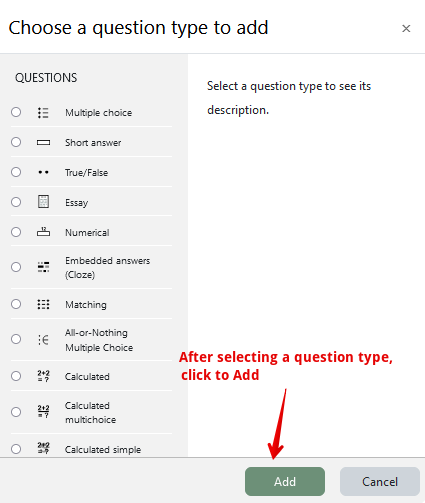
1. To add and create a new question, click on Add then click on 'a new question':
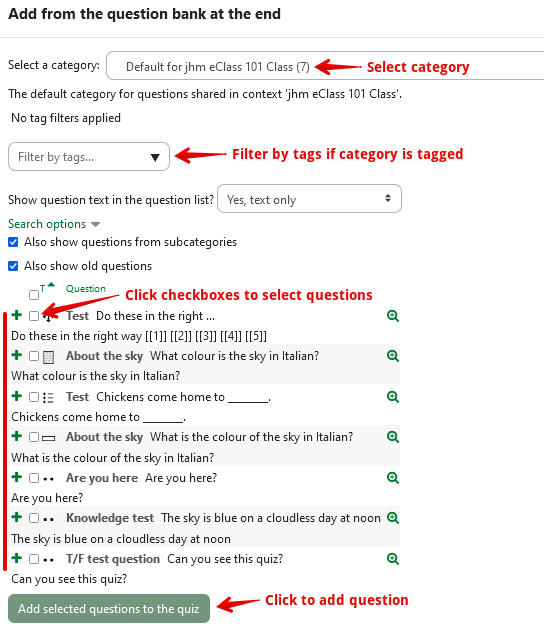
2. With this option, you can build a new question based on a wide selection of quiz question types. 1. To add from a question bank, click on Add then click on 'from question bank':
2. If you only want to add only one question to your quiz from the question bank, you can select the + icon to the left of your chosen question to add it.
Important: Editing any part of a question that was added from a question bank will apply the change to the question anywhere it appears.
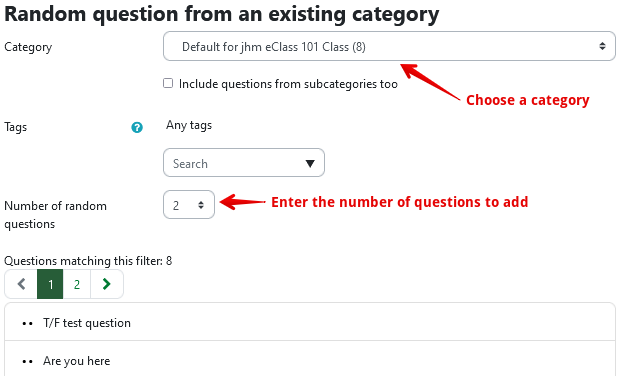
If this question has been used in a previous exam, create a new question instead of editing the existing one. If you have duplicated a prior quiz, delete the question and create a new version of it instead of editing it to avoid this issue. 1. To add random questions, first, select the category containing your set of questions to be used. 2. Choose the number of questions from this category that you would like each student to answer. You may even filter questions by specific tags. 3. Click Add random question when done.
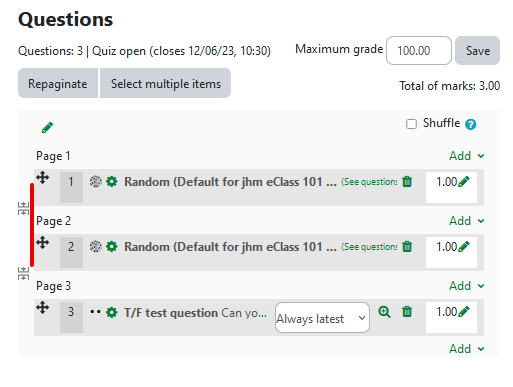
4. When 2 random questions are selected as above, 2 new questions are added to the quiz editing overview:
5. For random questions, each student could be asked to answer any questions added from the selected category. Note: Random questions are better drawn from a category with more, rather than fewer, questions.
1. We strongly recommend that only one question is put on each page 2. Changes are saved whenever a student navigates between pages. Saving pages when moving to a new page limits data loss in the event of an internet connection interruption, power failure, etc. 3. Nevertheless, some questions may have to be grouped together. For example, you may ask several questions about a single description-type question:
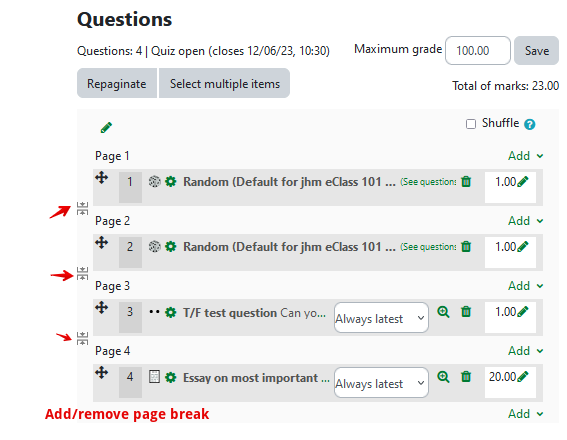
4. Page breaks can be added and removed manually clicking the icons to the left of the questions.
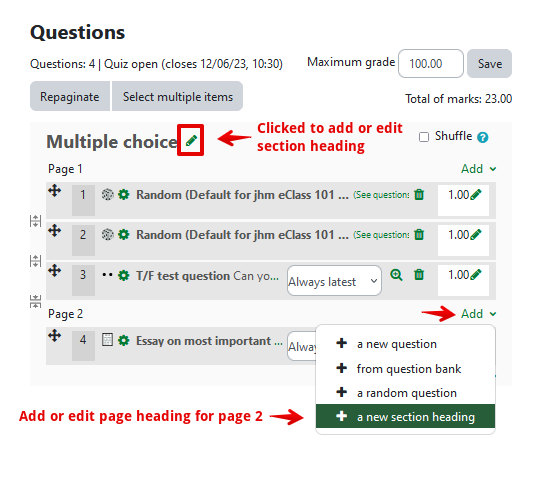
6. Quiz pages can have headings added to them to provide contextual information about the questions on the page. 7. Headings can be added by clicking the pencil icon near the top left, above the page number. 8. Headings for inserted pages must be added from the 'Add' dropdown which only appears between pages where no heading exists:
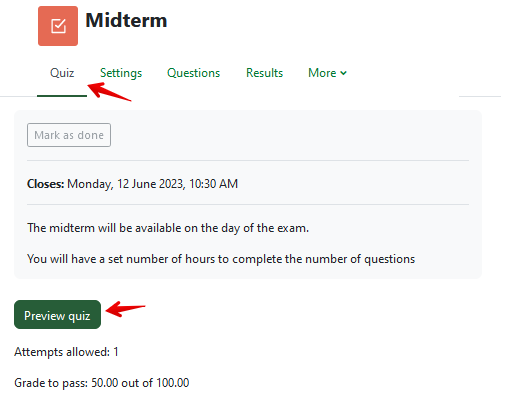
9. Press 'Enter' to save headings. 10. Section names are visible both to a student taking a quiz and to an instructor previewing a quiz:
11. The quiz navigation panel is on the right side of the quiz page attempt or preview: The Repaginate button near the top left of the questions page can be used to re-organize the quiz with a set number of questions per page. This can be helpful after adding or reordering questions to restore your intended layout. Note: it is not possible to repaginate quizzes after any student attempts have been made.
Before any attempts are made, it is also possible to repaginate and/or specify that quizzes to display quizzes with one question per page on the quiz settings page. In the ‘Layout’ section of the quiz settings, set New page to 'Every question'. Selecting 'Repaginate now' will force the quiz to repaginate. 1. There are multiple tools for arranging the format of your quiz:
2. Existing questions can be edited and updated using the displayed icons. A brief description of the function of each of these icons is included below:
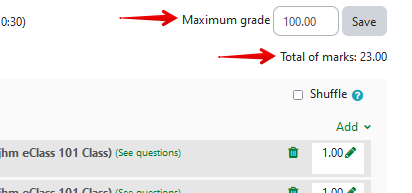
1. If the 'Maximum grade' is different from the 'Total of marks', the quiz will display a grade out of the maximum in the grade book:
2. The 'Total of marks' indicates the maximum amount of marks a student can get on the quiz. 3. The 'Maximum grade' indicates what the quiz will be scored out of in the gradebook and can be adjusted to match the grade breakdown in your syllabus. 4. Student grades are automatically scaled for display in the gradebook (e.g., in the screenshot above, 3/6 on the quiz would translate to 50/100 in the gradebook). 5. If you do not want a quiz to appear in the gradebook at all, you can set the Maximum grade to 0.
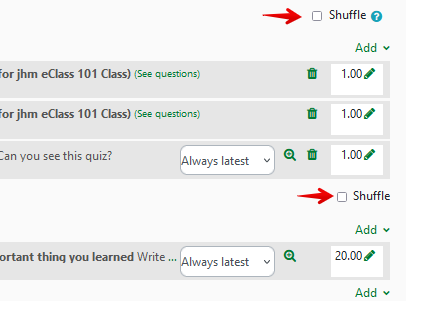
1. Shuffling of questions from the 'Questions page affects the order in which the questions are presented to the student.
2. Shuffling can be set independently for each section of a quiz and does affect the order of questions set in other sections of the quiz. 3. If you wish to shuffle the order of choices in multiple-choice or matching questions, first see the question behaviour section in our article Adding Quizzes. | |
|
|

