NOTICE: Please be advised that the content of this article may only be relevant for users concluding the final stages of course work on eClass or for users on the eClass External system. The eClass Learning Management System is currently in a read-only state that prohibits new courses, enrollments, and users from being added to the site. Credit courses and co-curricular courses at the UofA are now being delivered on Canvas, and full articles on how to use Canvas can be found here.
Quizzes are excellent ways to assess students' comprehension of course material. They can provide a secure, automatic way of collecting students' responses to questions that can be used as activities, weekly homework assignments, confidential feedback, etc.... as more than just quizzes. Quizzes where the answers do not require manual grading (i.e., for essay questions) synch directly into your course grade book.
There is a wide range of available question types, including drag and drop, calculated, calculated multiple choice, simple calculated, embedded answers, essay, matching, multiple choice, numerical response, random short-answer matching, short answer, and true/false. There are also a wide number of quiz delivery options and formats for quizzes.
This article covers the addition of a quiz to a course and discusses in full the wide range of settings available for different quiz delivery scenarios. To get going quickly with creating and adding quiz questions, all that is required is to add the quiz name and restrict students from accessing it using the common module 'Availability' setting.
Adding a Quiz
- Click on Turn editing on, near the top right side.
- Move to the topic area where you wish to add content (the week, unit, etc…) and click on the Add an Activity or Resource button.
- Click on the Quiz icon.
- A new page will appear with the quiz settings.
- There is a wide range of settings where you can enter specific customizations for your quiz. All that is required is the Name.
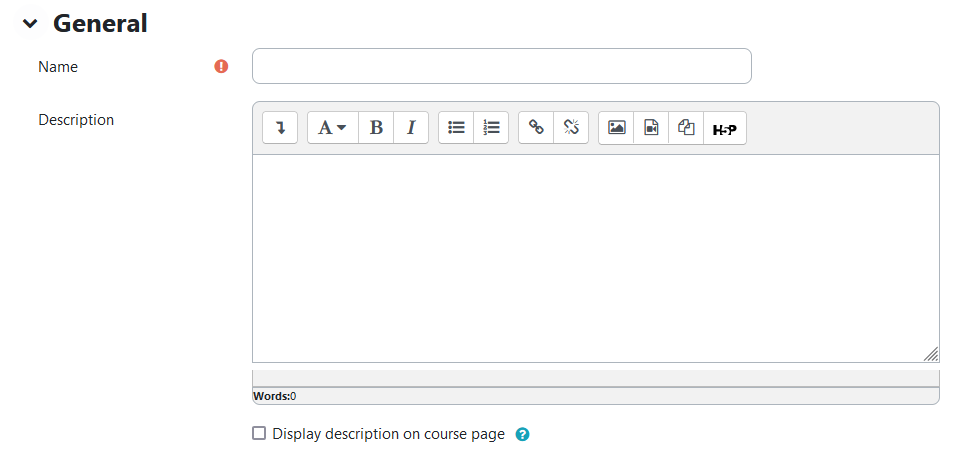
General
- "Name" is required. Make this as meaningful as possible for your students.
- “Description”: Optionally provides explanation and instructions for your students.
- “Display description on course page”: The description of your quiz will be displayed on the course page below the link to the quiz.
Timing
- "Open the quiz": Determines when your students will be allowed to make attempts at the quiz. Students must complete the quiz between this time and the time specified in "Close the quiz".
- "Time limit": Determines how long students will have during each attempt of the quiz.
- "When time expires": Toggles what happens when the time expires.
- 'Open attempts are submitted automatically': This default setting is a good choice because it handles most cases where submissions get left open and cannot be adjusted by instructors.
- 'There is a grace period when open attempts can be submitted, but no more questions answered’
Note: With a grace period for submission, students should be advised to click on the button "Submit all and finish" for their attempt to be recorded
- 'Attempts must be submitted before the time expires or they are not counted'
- “Submission grace period”: If what to do when the time expires is set to “There is a grace period…”, this is the amount of extra time that is allowed.
Note: The timing settings that you specify here determine what options are available for students to review their quizzes after completion. See the 'Review options' section below.

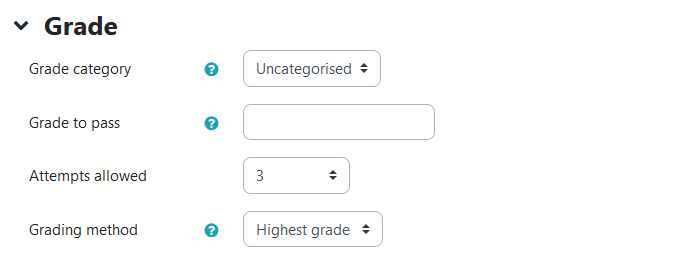
Grade
- “Grade category”: Controls the category in which the grades in this quiz are placed in the gradebook. (Not required)
- “Grade to pass”: Determines the minimum required grade to pass. The value is used in activity or course completion, and in the gradebook, where pass grades are highlighted in green and fail grades in red.
- “Attempts allowed”: Determines how many attempts can be made while the quiz is open.
- “Grading method”: When multiple attempts are allowed, the following methods are available for calculating the final quiz grade:
- Highest grade of all attempts
- Average (mean) grade of all attempts
- First attempt (All other attempts are ignored)
- Last attempt (All other attempts are ignored)
Layout
- “New page”: Determines how many questions are displayed per page. We recommend that you only put a single question per page or set a small number of questions per page when building the quiz - if a student has spent a long time answering questions and runs into a network disconnection issue, they may lose their work. Forcing them to advance pages between questions saves their work in the event that something goes wrong.
- “Navigation method”
- ‘Free’ - Students can go back and forward to different questions via the question list.
- ‘Sequential’ - Students must progress through the quiz in order and may not return to previous pages nor skip ahead.

Question behaviour
- “Shuffle within questions”: Toggles whether or not the parts making up each question will be randomly shuffled each time a student attempts the quiz. This setting only applies to questions that have multiple parts, such as multiple-choice or matching questions. Note that if you have set questions and answers that require a fixed order you should set this to 'No'.
- “How questions behave”: Determines how you want the students to interact with the questions in the quiz. The following are the most commonly used modes of behaviour:
- ‘Deferred feedback’: Students have to enter an answer to each question and then submit the entire quiz before anything is graded or they get any feedback.
- ‘Interactive with multiple tries’: Students have to submit each question as they go along to get immediate feedback, and if they do not get it right immediately, they can have another try for fewer marks.
- For more information about question behaviour modes, see this Moodle documentation.
- “Allow redo within an attempt”: Toggles whether or not the students will see a Redo question button when they have finished attempting the question. This allows them to attempt another version of the same question, without having to submit the entire quiz attempt and start another one. This option is mainly used for practice quizzes and only affects questions (e.g. not Essay questions) and behaviours (e.g. Immediate feedback, or Interactive with multiple tries) where it is possible for students to finish the question before the attempt is submitted.
- “Each attempt builds on the last”: Toggles whether or not each new quiz attempt will contain the results of the previous attempt, provided that the “Attempts allowed” option is enabled. This allows a quiz to be completed over several attempts.

Review options
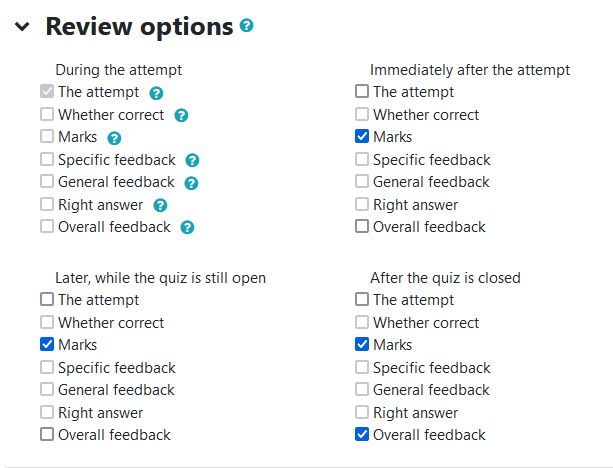
These settings determine what students are able to see during the four phases of quiz timing:
- 'During the attempt': These settings are only relevant for some behaviours, like ‘Interactive with multiple tries’, which may display feedback during the attempt.
- 'Immediately after the attempt': These settings apply for the first two minutes after ‘Submit all and finish’ is clicked.
- 'Later, while the quiz is still open': These settings apply after this, and before the quiz close date.
- 'After the quiz is closed': These settings apply after the quiz close date has passed. If the quiz does not have a close date, this state is never reached.
The default option, checking the 'Marks' box, shows only how the student scored on the quiz (i.e., their score only).
If you wish to allow students to review the quiz, you will need to check 'The attempt' to activate other review options for the appropriate time period.
Note: For summative exams like midterms and finals, the recommended settings would be to uncheck all the review options until quizzes have been reviewed and then released to students by checking the 'Marks' box in the 'Later' and 'After' columns.
- Note: Students who have not attempted a quiz will not be able to view questions or answers until they attempt the quiz regardless of the review options settings.
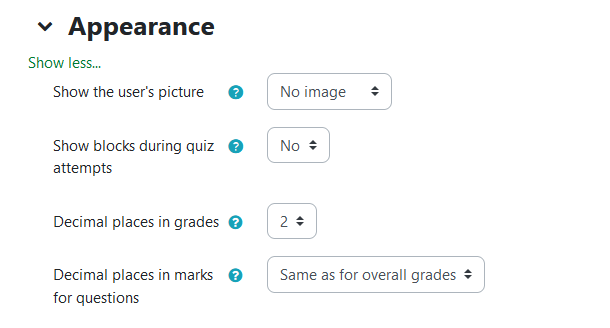
Appearance
- “Show the user’s picture”: Toggles whether or not the student’s name and picture will be shown on-screen during the attempt, and on the review screen, making it easier to check that the student is logged in as themselves in an invigilated (proctored) exam.
- “Decimal places in grades”: Determines the number of digits shown after the decimal point when displaying grades. It only affects the display of grades, not the grades stored in the database, nor the internal calculations, which are carried out to full accuracy.
- “Decimal places in question grades”: Determines the number of digits shown after the decimal point when displaying grades for individual questions.
- “Show blocks during quiz attempts”: Toggles whether or not normal blocks will be shown during quiz attempts.
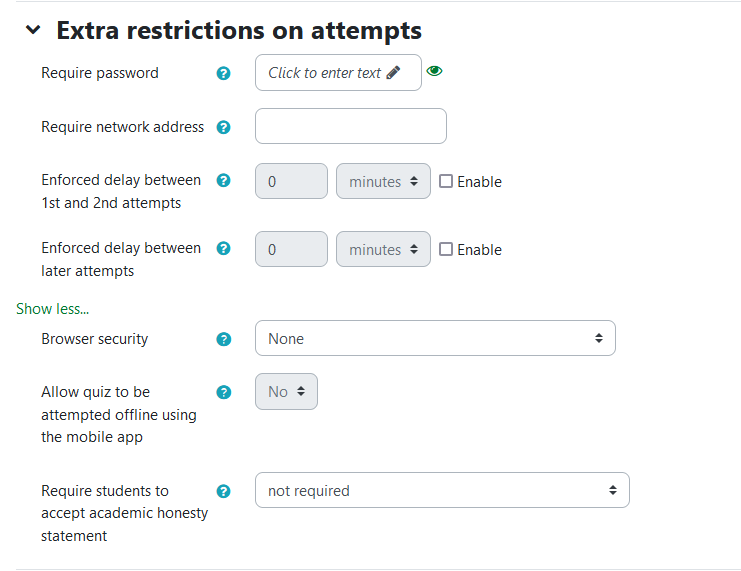
Extra restrictions on attempts
- “Require password”: If a password is specified, a student must enter it in order to attempt the quiz.
- “Require network address”: Restricts quiz access to particular subnets on the LAN or Internet by specifying a comma-separated list of partial or full IP address numbers. This can be useful for an invigilated (proctored) quiz, to ensure that only people in a certain location can access the quiz. Note that this setting will apply to any review options you select in the settings above, so please leave this setting disabled if you require your students to have unrestricted access when reviewing the quiz. Please note: Changes to the mechanism of provisioning lab computers have altered the IP addresses available in campus computer labs. For more information about this, please contact IST eClass support.
- “Enforced delay between 1st and 2nd attempts”: Toggles whether or not a student must wait for the specified time to elapse before being able to attempt the quiz a second time.
- “Enforced delay between later attempts”: Toggles whether or not a student must wait for the specified time to elapse before attempting the quiz a third time and any subsequent times.
- “Browser security”
- ‘Full-screen pop-up with some JavaScript Security’: The quiz will only start if the student has a JavaScript-enabled web browser. The quiz appears in a full-screen pop-up window that covers all the other windows and has no navigation controls. Students are prevented, as far as it is possible from using facilities like copy and paste.
- “Require students to accept academic honesty statement”: Toggles whether or not students will be able to start an attempt until they have ticked a checkbox confirming that they are aware of the policy on academic honesty.
- “Allow quiz to be attempted offline using the mobile app”: Toggles whether or not a mobile app user can download the quiz and attempt it offline. Note that it is not possible for a quiz to be attempted offline if it has a time limit, or requires a network address, or uses any question behaviour other than ‘Deferred feedback’ (with or without CBM).
- Quiz security can also be added to eClass quizzes by using ExamLock.
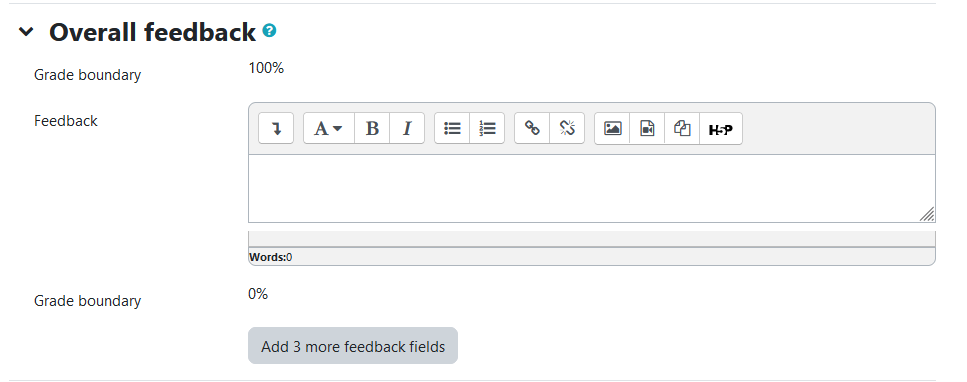
Overall feedback
Overall feedback is the text that is shown after a quiz has been attempted. By specifying additional grade boundaries (as a percentage or as a number). The text shown can depend on the grade obtained.
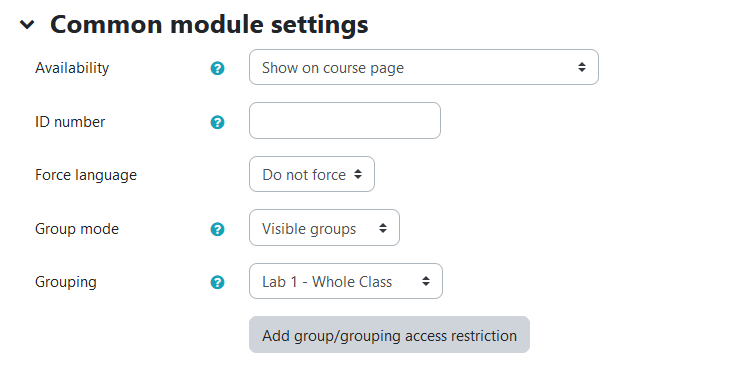
Common module settings
- "Availability": This setting has 3 options:
- 'Show on course page' - The activity is available to students (subject to any access restrictions which may be set).
- 'Hide from students' - The activity is only available to users with permission to view hidden activities (by default, users with the role of teacher or non-editing teacher).
- 'Make available but now shown on course page' - A link to the activity must be provided from elsewhere, such as from a page resource. The activity would still be listed in the gradebook and other reports.
- “ID number": An ID number identifies the activity for grade calculation purposes.
- "Group mode": The group mode defined at the course level is the default mode for all activities within the course. Each activity that supports groups can also define its own group mode, though if the group mode is forced at the course level, the group mode setting for each activity is ignored. This setting has 3 options:
- No groups - Students are not segregated into groups.
- Separate groups - Only group members can see their own group while other groups remain invisible.
- Visible groups - Group members can see other groups but still work in their own group.
- "Grouping": A grouping is a collection of groups within a course. If a grouping is selected, students assigned to groups within the grouping will be able to work together.
- “Add group/grouping access restriction”: Allows access only to students who belong to a specified group, or all groups.
Restrict access
Tags
- See this article. Note that at present, tagging questions offers no functional utility - this will be introduced in a future version of eClass.
Once you have chosen all the settings, clicking Save and display will immediately enable you to begin adding questions to your quiz. If you click Save and return to course, you access the interface for adding questions by first clicking the quiz link on your course home page, then on the gear icon in the top right of the quiz section, and then on Edit quiz. For more detail on adding questions to quizzes, see the article Adding and Managing Quiz Questions.
Notes
- Note: Students who have not attempted a quiz will not be able to view questions or answers until they attempt the quiz regardless of the review options settings.
- For random questions from large categories, you may run into an issue where not all of the multiple choice questions that students answered can be clicked on to view detailed statistics for that question. This can occur when more than 10 different questions from a single category have been viewed and answered. In this case, click on the last random question for that category to view all of the questions viewed by your students. If you have any questions about this, we can be reached at eclass@ualberta.ca or at 780-492-9372.
- To review students' attempts once they have completed a quiz, enter the quiz and click the Attempts: xx link above the Attempt quiz now button. Alternatively, you can access the student attempts for the quiz, as well as their actual responses, statistics for each quiz question, and any items requiring manual grading (essays) by clicking on the gear icon in the top right of the quiz section, then on Results. For more details please see this article: Quizzes - Grading Quizzes.
- Hiding a quiz from the eClass course page will also hide the grade for that quiz in the gradebook.
- Other articles about quiz construction you may want to see as well:
|


